todo
所属分类:OA办公系统
开发工具:Dart
文件大小:0KB
下载次数:0
上传日期:2020-12-18 17:27:14
上 传 者:
sh-1993
说明: 基于玩安卓api的todo
(Todo based on Android API)
文件列表:
.metadata (305, 2020-12-18)
.vscode/ (0, 2020-12-18)
.vscode/launch.json (500, 2020-12-18)
android/ (0, 2020-12-18)
android/app/ (0, 2020-12-18)
android/app/build.gradle (1763, 2020-12-18)
android/app/src/ (0, 2020-12-18)
android/app/src/debug/ (0, 2020-12-18)
android/app/src/debug/AndroidManifest.xml (324, 2020-12-18)
android/app/src/main/ (0, 2020-12-18)
android/app/src/main/AndroidManifest.xml (2810, 2020-12-18)
android/app/src/main/kotlin/ (0, 2020-12-18)
android/app/src/main/kotlin/com/ (0, 2020-12-18)
android/app/src/main/kotlin/com/example/ (0, 2020-12-18)
android/app/src/main/kotlin/com/example/todo/ (0, 2020-12-18)
android/app/src/main/kotlin/com/example/todo/MainActivity.kt (121, 2020-12-18)
android/app/src/main/res/ (0, 2020-12-18)
android/app/src/main/res/drawable/ (0, 2020-12-18)
android/app/src/main/res/drawable/launch_background.xml (434, 2020-12-18)
android/app/src/main/res/mipmap-hdpi/ (0, 2020-12-18)
android/app/src/main/res/mipmap-hdpi/ic_launcher.png (544, 2020-12-18)
android/app/src/main/res/mipmap-mdpi/ (0, 2020-12-18)
android/app/src/main/res/mipmap-mdpi/ic_launcher.png (442, 2020-12-18)
android/app/src/main/res/mipmap-xhdpi/ (0, 2020-12-18)
android/app/src/main/res/mipmap-xhdpi/ic_launcher.png (721, 2020-12-18)
android/app/src/main/res/mipmap-xxhdpi/ (0, 2020-12-18)
android/app/src/main/res/mipmap-xxhdpi/ic_launcher.png (1031, 2020-12-18)
android/app/src/main/res/mipmap-xxxhdpi/ (0, 2020-12-18)
android/app/src/main/res/mipmap-xxxhdpi/ic_launcher.png (1443, 2020-12-18)
android/app/src/main/res/values/ (0, 2020-12-18)
android/app/src/main/res/values/styles.xml (951, 2020-12-18)
android/app/src/profile/ (0, 2020-12-18)
android/app/src/profile/AndroidManifest.xml (324, 2020-12-18)
android/build.gradle (582, 2020-12-18)
android/gradle.properties (104, 2020-12-18)
android/gradle/ (0, 2020-12-18)
android/gradle/wrapper/ (0, 2020-12-18)
... ...
在使用了 Provider 一年后,遇到了很多阻力,期间尝试过 BLoC 、MobX ,均不如意,一个样本代码太多,使用复杂,一个生产代码要等很久。难道 Flutter 就没有诸如原生 Android 的 jetpack 套装一样方便的套件吗?后来开始尝试 GetX,才发现真香,正如作者所说:
> GetX是Flutter的超轻便且强大的解决方案。它以快速实用的方式结合了高性能状态管理,智能依赖性注入和路由管理。
我写了一个[demo](https://www.jianshu.com/p/920db9e968f0)探索过了基本使用方式之后,又决定写一个 待办清单app 实践一下 Clean Architecture 。
首先感谢下鸿洋大佬的 [todo api](https://www.wanandroid.com/blog/show/2442),第一版是利用 api 开发的一个在线应用,后来在不注册的情况下,加入 moor 数据库,可以离线使用。这一部分改的仓促,下一期迭代会改进。
## 项目依赖和结构
```
dependencies:
flutter:
sdk: flutter
cookie_jar: ^1.0.1
cupertino_icons: ^1.0.0
date_format: ^1.0.9
dio: ^3.0.10
dio_cookie_manager: ^1.0.0
dio_http_cache: ^0.2.11
flutter_slidable: ^0.5.7
get: ^3.21.2
google_fonts: ^1.1.1
moor: ^3.4.0
path: ^1.7.0
path_provider: ^1.6.24
pull_to_refresh: ^1.6.3
shared_preferences: ^0.5.12+4
table_calendar: ^2.3.1
```
项目网络模块封装了 dio,因为是 带 cookie 的 请求,所以加入了 cookie 和本地化,算是一个比较完善的请求模块。
数据库选用了 moor ,Android 中 room 的字母倒过来就是这个,和 room 一样可以响应式,十分优秀。
剩下的第三方包就是分页和侧滑控件,还有一个日历包。
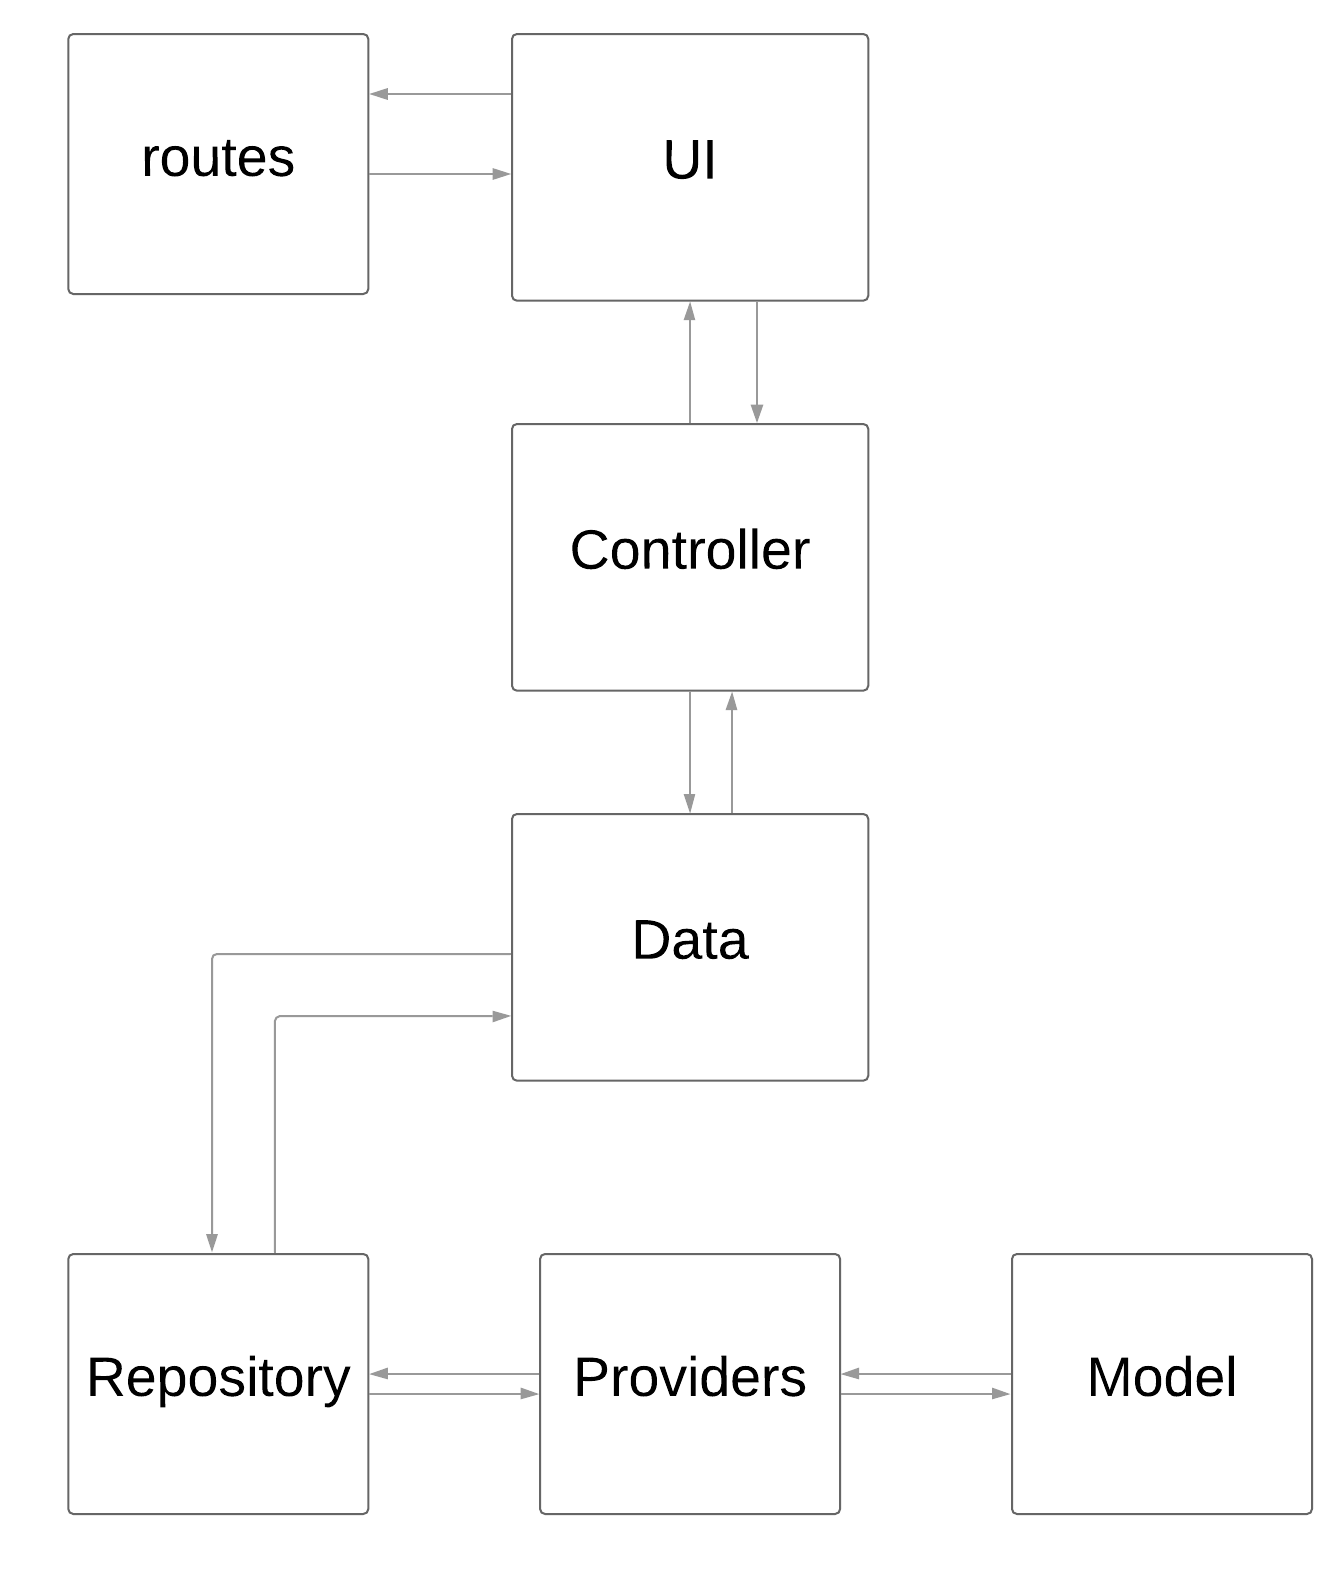
整体项目的结构参考[getx_pattern](https://kauemurakami.github.io/getx_pattern/),又按照自己的习惯做了修改。
## 从 GetX 开始开发
### 使用 GetX
```
void main() async {
runApp(GetMaterialApp(
debugShowCheckedModeBanner: false,
initialRoute: '/',
builder: (context, child) => Scaffold(
// Global GestureDetector that will dismiss the keyboard
body: GestureDetector(
onTap: () {
hideKeyboard(context);
},
child: child,
),
),
theme: appThemeData,
defaultTransition: Transition.fade,
getPages: AppPages.pages,
initialBinding: SplashBinding(),
home: SplashPage(),
));
}
```
### 命名路由
要使用完整的路由功能,需要把 MaterialApp 替换为 GetMaterialApp ,中间加入的`builder` 是为了解决点击空白处隐藏键盘的需求,这个在原生也很常见。
```abstract class AppPages {
static final pages = [
GetPage(
name: Routes.LOGIN,
page: () => LoginPage(),
binding: LoginPageBinding(),
),
GetPage(
name: Routes.SPLASH,
page: () => SplashPage(),
binding: SplashBinding(),
),
GetPage(
name: Routes.SIGN_UP,
page: () => SignUpPage(),
binding: SiginUpBinding(),
),
GetPage(
name: Routes.TASK,
page: () => TaskPage(),
binding: TaskBinding(),
),
GetPage(
name: Routes.TASK_ADD,
page: () => AddTaskPage(),
binding: AddTaskBinding(),
),
GetPage(
name: Routes.TASK_DETAILS,
page: () => TaskDetailsPage(),
),
GetPage(
name: Routes.TASK_EDIT,
page: () => EditTaskPage(),
binding: EditTaskBinding(),
),
GetPage(
name: Routes.TASK_MOTHLY,
page: () => MonthlyPage(),
binding: MonthlyBinding(),
),
GetPage(
name: Routes.PROFILE,
page: () => ProfilePage(),
),
];
}
```
习惯了使用命名路由,所以定义了路由表。`binding`是 GetX 中我特别喜欢的功能——依赖注入,就像原生的 Hilt 一样,让代码结构无侵分层。并且如果使用的是流或计时器,它们将自动关闭,开发者根据不用担心。Binding 类是一个解耦依赖注入的类,在路由的时候使用。就可以知道注入的作用域,以及知道在何处以及如何处置注入的对象。
### 登录
api 是玩安卓的开放 api,登录要使用 api 和 repository,所以依赖注入的形式注入:
```
class LoginPageBinding implements Bindings {
@override
void dependencies() {
Get.lazyPut(() => LoginApi());
Get.lazyPut(() => LoginRepository());
Get.lazyPut(
() => LoginController(),
);
}
}
```
在使用的时候直接 `find`:
```class LoginController extends GetxController {
final LoginRepository repository = Get.find();
```
`Get.put()`是最常见的注入依赖的方法,它是直接注入到内存里。你可以在任何地方找到注入的对象,这是 Provider 所没有的功能。
仅有`put`还不够,GetX 还提供另外一个方法,`Get.lazyPut`可以懒加载一个依赖,这样它只有在使用时才会被实例化。这对于计算代价高的类来说非常有用,或者如果你想在一个地方实例化几个类(比如在 Bindings 类中),但是不知道会不会使用到,那懒加载是正确的选择,是不是很像 kotlin 的 lazy。
显示密码的功能暂时未加。

在欢迎页会注入全局的依赖,然后判断是否登录,对应不同的导航:
```class SplashController extends GetxController {
@override
void onReady() async {
super.onReady();
await GloabConfig.init();
await DenpendencyInjection.init();
LoginProvider loginProvider = Get.find();
print(loginProvider);
// 如果未登录就登录
// 如果已登录就去task页面
if (loginProvider.isLogin()) {
Get.offNamed(Routes.TASK);
} else {
Get.offNamed(Routes.LOGIN);
}
}
}
```
### Task 列表

主页实现了底部导航和嵌入式`FloatingActionButtonLocation`,没有任务的时候会弹出使用引导。点击加号可以添加任务。因为 api 是分页的,所以也做了分页处理。
```class TaskPage extends GetView {
@override
Widget build(BuildContext context) {
return Scaffold(
appBar: AppBar(title: Text('My Task')),
body: Body(),
floatingActionButton: FloatingActionButton(
onPressed: () {
Get.toNamed(Routes.TASK_ADD);
},
child: Icon(Icons.add),
),
floatingActionButtonLocation: FloatingActionButtonLocation.centerDocked,
bottomNavigationBar: BottomAppBar(
shape: CircularNotchedRectangle(),
child: Row(
mainAxisAlignment: MainAxisAlignment.spaceBetween,
children: [
IconButton(
icon: Icon(Icons.calendar_today_sharp),
onPressed: () {
Get.toNamed(Routes.TASK_MOTHLY);
},
),
IconButton(
icon: Icon(Icons.settings),
onPressed: () {
Get.toNamed(Routes.PROFILE);
},
),
],
),
),
);
}
}
```
任务 `item`可以点击进入详情和侧滑,有两个侧滑菜单,编辑和删除,对应不同的功能,圆形的`checkbox`可以完成任务,任务标题和时间在完成时会有删除线。
`GetView` 就是封装的`StatelessWidget`,内部有一个 `get`方法便捷的获取注入的`controller`,这样连获取的步骤都能省略。
### 增加和编辑


对应的标题是必须项,描述可以为空,时间是默认当前,优先级有高低中三个,默认是中。
选择日期会弹出日历你,采用局部刷新,提高性能,`update([updateDateId])`函数的参数是一个 id,只会刷新对应 id 的 `GetBuilder`,并且 GetX 不受 `InheritedWidget`的限制,所以可以在任意地方引用未被内存回收的 `Controller`,所以可以在编辑页面,让列表页也同时刷新。

```
void handleDatePicker() async {
final datePick = await showDatePicker(
context: Get.context,
firstDate: DateTime(2000),
initialDate: _dateTime,
lastDate: DateTime(2100));
if (datePick != null && datePick != _dateTime) {
_dateTime = datePick;
task.dateStr = _dateTime.format();
dateTimeController.text = task.dateStr;
update([updateDateId]);
}
}
```
```
void submit() async {
if (formKey.currentState.validate()) {
formKey.currentState.save();
try {
Get.loading();
await _taskRepository.updateTask(task);
Get.dismiss();
// 刷新列表页
Get.find().update();
// controller.updateTask(task);
Get.back();
} catch (e) {
print(e);
Get.dismiss();
Get.snackbar('Error', e.toString());
}
}
}
```
### 月份视图

月份视图用了`table_calendar`包,这个包功能强大,可以定制日历视图。默认显示两周,点击月份展开四周的月份视图。可以按日期筛选出任务。这里的任务可以点击进入详情和点击`checkbox`更改状态。
```
TableCalendar(
onDaySelected: (DateTime day, _, __) {
controller.selectedDate(day);
},
calendarController: controller.calendarController,
startingDayOfWeek: StartingDayOfWeek.monday,
initialCalendarFormat: CalendarFormat.week,
calendarStyle: CalendarStyle(
selectedColor: Theme.of(context).accentColor,
),
)
```
这里更改状态后,同样可以拿到列表页的`Controller`去更新列表页:
```
modifyTaskStatus(Task task) async {
try {
TaskController taskController = Get.find();
await taskController.modifyTaskStatus(task);
} catch (e) {}
update();
}
```
### 个人中心

个人中心是一个静态页面,最下面展示了我写的 GetX 的 demo 截图。点击放大的功能放在迭代里做吧。
这里藏有福利,一个漂亮的二次元萌妹子。
### 扩展函数
在 `utils`文件夹下写了两个扩展函数,扩展了日期格式化和基于 GetX 的全局加载框。
```
extension DateExtension on DateTime {
String format() {
return formatDate(this, [
yyyy,
'-',
mm,
'-',
dd,
]);
}
}
```
```
extension GetExtension on GetInterface {
dismiss() {
if (Get.isDialogOpen) {
Get.back();
}
}
loading() {
if (Get.isDialogOpen) {
Get.back();
}
Get.dialog(LoadingDialog());
}
}
```
使用也很简单,但不要忘了要导入扩展函数类:
```
dateTime.format();
```
```
Get.loading();
。。。。。。
Get.dismiss();
```
### GetService
GetService 我的理解是类似服务,比如 SharedPreferences、Database,还有需要异步初始化的类,放在这里注入非常合适:
```class TaskDaoController extends GetxService {
TaskDao init() {
TaskDatabase database = TaskDatabase();
return TaskDao(database);
}
}
```
```
class AppSpController extends GetxService {
Future init() async {
return await SharedPreferences.getInstance();
}
}
```
同步的就用同步方法注入:
```
// 数据库
Get.put(TaskDaoController().init());
```
异步的用异步方法注入:
```
// shared_preferences
await Get.putAsync(() => AppSpController().init());
```
### 数据库 moor 的使用
Android 通过 room 给开发带来的便利,用过的都知道。moor 就是 Flutter 上的 room。
Moor 使用 Dart 的源代码生成器生成代码,我们可以用函数式的调用操作数据库。这也是需要 moor_generator 依赖项以及 build_runner 的原因。
moor 优点之一是我们可以完全使用 Dart 操作数据库,而不必写数据库语句。这也适用于定义SQL表。创建一个表示 table 的类即可。
```
class Tasks extends Table {
// 可空类型
IntColumn get completeDate => integer().nullable()();
TextColumn get completeDateStr => text().nullable()();
TextColumn get content => text().nullable()();
// 为空自动生成默认值
IntColumn get date =>
integer().clientDefault(() => DateTime.now().millisecondsSinceEpoch)();
// 为空自动生成默认值
TextColumn get dateStr =>
text().nullable().clientDefault(() => DateTime.now().format())();
// 主键
IntColumn get id => integer().nullable().autoIncrement()();
// 为空自动生成默认值
IntColumn get priority => integer().nullable().withDefault(Constant(0))();
// 为空自动生成默认值
IntColumn get status => integer().nullable().withDefault(Constant(0))();
TextColumn get title => text()();
IntColumn get type => integer().withDefault(Constant(0))();
IntColumn get userId => integer().nullable()();
}
@UseMoor(tables: [Tasks], daos: [TaskDao])
class TaskDatabase extends _$TaskDatabase {
// we tell the database where to store the data with this constructor
TaskDatabase() : super(_openConnection());
// you should bump this number whenever you change or add a table definition. Migrations
// are covered later in this readme.
@override
int get schemaVersion => 1;
}
LazyDatabase _openConnection() {
// the LazyDatabase util lets us find the right location for the file async.
return LazyDatabase(() async {
// put the database file, called db.sqlite here, into the documents folder
// for your app.
final dbFolder = await getApplicationDocumentsDirectory();
final file = File(join(dbFolder.path, 'db.sqlite'));
return VmDatabase(file);
});
}
```
数据库操作写在这里也可以,但是会显得臃肿,moor 还提供 Dao ,把操作放在 Dao 类是个好习惯:
```
@UseDao(tables: [Tasks])
class TaskDao extends DatabaseAccessor with _$TaskDaoMixin {
TaskDao(TaskDatabase db) : super(db);
/// 获取全部
Future> get getAllTasks => select(tasks).get();
///imit查询来限制返回的结果数量
///offset偏移量
Future> getTasks(int limit, {int offset}) {
return (select(tasks)..limit(limit, offset: offset)).get();
}
///imit查询来限制返回的结果数量
///offset偏移量
Future> getTasksWithDateStr(String dateStr) {
return (select(tasks)..where((e) => e.dateStr.equals(dateStr))).get();
}
/// 获取单个数据
/// 没必要用list
Future getTaskById(int id) {
return (select(tasks)..where((t) => t.id.equals(id))).getSingle();
}
Future updateTask(Task entry) {
TasksCompanion();
return update(tasks).replace(entry);
}
Future createOrUpdateUser(String title,
{String content, String date, int type = 0, int priority = 0}) {
return into(tasks).insertOnConflictUpdate(TasksCompanion(
title: Value(title),
content: Value(content),
dateStr: Value(date),
type: Value(type),
priority: Value(priority),
));
}
Future createTask(TasksCompanion task) async {
var id = await into(tasks).insertOnConflictUpdate(task);
return getTaskById(id);
}
/// 批量插入
Future insertMultipleTasks(List entries) async {
await batch((batch) {
batch.insertAll(tasks, entries);
});
}
Future deleteTaskById(int id) {
return (delete(tasks)..where((t) => t.id.equals(id))).go();
}
Future deleteTask(Task entry) {
return delete(tasks).delete(entry);
}
Future modifyStatusByid(int id, int status) async {
// into(tasks).up
Task task = await getTaskById(id);
task.copyWith(
status: status,
);
await updateTask(task);
return task;
}
Future modifyTask(Task task) {
return update(tasks).replace(task);
}
/// 表中数据改变,会发生一个流
Stream> watchEntriesInCategory() {
return select(tasks).watch();
}
}
```
## 总结
从路由管理到依赖注入,再到状态管理,还有 Service ,这个应用都应用到了,并轻松的实现了代码解耦。再加上骚粉的 UI ,是不错新手学习项目。
todo:
* 显示密码
* 退出登录
* 拆分网络请求和本地存储
* 个人中心大图浏览
* 国际化
* 切换主题
* 修改图标
。。。


近期下载者:
相关文件:
收藏者: