peeps
所属分类:操作系统开发
开发工具:Python
文件大小:0KB
下载次数:0
上传日期:2022-05-22 14:31:27
上 传 者:
sh-1993
说明: 与Blender 3.0接口的编程动画库
(A programmatic animation library that interfaces with Blender 3.0)
文件列表:
LICENSE (1069, 2022-05-22)
peeps/ (0, 2022-05-22)
peeps/__init__.py (453, 2022-05-22)
peeps/blobjects/ (0, 2022-05-22)
peeps/blobjects/__init__.py (667, 2022-05-22)
peeps/blobjects/blobject.py (25892, 2022-05-22)
peeps/blobjects/circuits.py (11888, 2022-05-22)
peeps/blobjects/graph.py (27992, 2022-05-22)
peeps/blobjects/measurements.py (11647, 2022-05-22)
peeps/blobjects/scene.py (2052, 2022-05-22)
peeps/blobjects/shapes.py (68017, 2022-05-22)
peeps/blobjects/text.py (33000, 2022-05-22)
peeps/constants.py (4734, 2022-05-22)
peeps/dynamics/ (0, 2022-05-22)
peeps/dynamics/__init__.py (313, 2022-05-22)
peeps/dynamics/electricity.py (13027, 2022-05-22)
peeps/dynamics/field_lines.py (8220, 2022-05-22)
peeps/dynamics/gravity.py (8754, 2022-05-22)
peeps/externals/ (0, 2022-05-22)
peeps/externals/__init__.py (697, 2022-05-22)
peeps/externals/bezier_interpolation.py (7419, 2022-05-22)
peeps/externals/blender_utils.py (3359, 2022-05-22)
peeps/externals/camera_utils.py (11014, 2022-05-22)
peeps/externals/glow_utils.py (1742, 2022-05-22)
peeps/externals/iterable_utils.py (5298, 2022-05-22)
peeps/externals/miscellaneous.py (7233, 2022-05-22)
peeps/frame.py (27341, 2022-05-22)
requirements.txt (15, 2022-05-22)
sample_scripts/ (0, 2022-05-22)
sample_scripts/sample_1_beginner.py (9256, 2022-05-22)
sample_scripts/sample_2_intermediate.py (17655, 2022-05-22)
... ...

# Table of Contents
- [Table of Contents](https://github.com/hmomin/peeps/blob/master/#table-of-contents)
- [Introduction](https://github.com/hmomin/peeps/blob/master/#introduction)
- [Benefits](https://github.com/hmomin/peeps/blob/master/#benefits)
- [Drawbacks](https://github.com/hmomin/peeps/blob/master/#drawbacks)
- [Installation on Windows](https://github.com/hmomin/peeps/blob/master/#installation-on-windows)
- [Installing Blender](https://github.com/hmomin/peeps/blob/master/#installing-blender)
- [Configuring Startup Behavior](https://github.com/hmomin/peeps/blob/master/#configuring-startup-behavior)
- [Installing Python](https://github.com/hmomin/peeps/blob/master/#installing-python)
- [Installing FFmpeg](https://github.com/hmomin/peeps/blob/master/#installing-ffmpeg)
- [Installing LaTeX](https://github.com/hmomin/peeps/blob/master/#installing-latex)
- [Installing peeps](https://github.com/hmomin/peeps/blob/master/#installing-peeps)
- [Trying Out Your First Script](https://github.com/hmomin/peeps/blob/master/#trying-out-your-first-script)
- [Running the Script](https://github.com/hmomin/peeps/blob/master/#running-the-script)
- [Rendering Animations](https://github.com/hmomin/peeps/blob/master/#rendering-animations)
- [Going Beyond the Basics](https://github.com/hmomin/peeps/blob/master/#going-beyond-the-basics)
- [Contributing](https://github.com/hmomin/peeps/blob/master/#contributing)
- [License](https://github.com/hmomin/peeps/blob/master/#license)
# Introduction
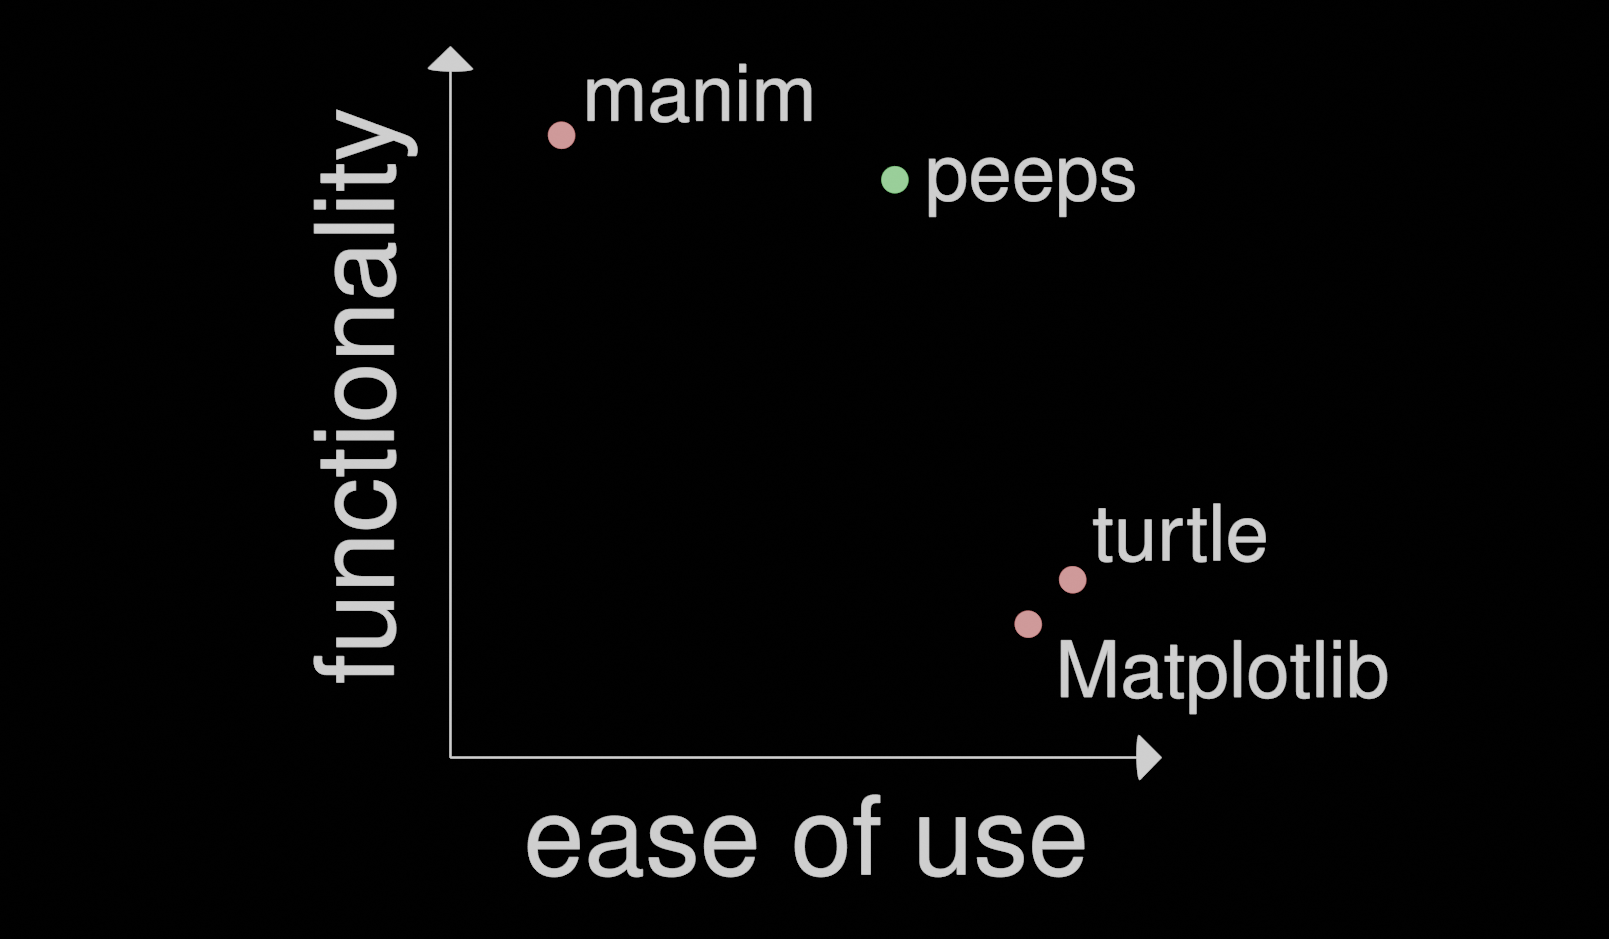
Peeps is a programmatic animation library that runs on Blender 2.80 and Python 3. It's used to make the animated videos on [peepphysics.com](https://github.com/hmomin/peeps/blob/master/https://peepphysics.com). Currently, there are many popular ways to animate within Python, including [Matplotlib](https://github.com/hmomin/peeps/blob/master/https://github.com/matplotlib/matplotlib), [turtle](https://github.com/hmomin/peeps/blob/master/https://github.com/python/cpython/blob/master/Lib/turtle.py), and [manim](https://github.com/hmomin/peeps/blob/master/https://github.com/3b1b/manim). However, while Matplotlib and turtle are highly limited in their functionality but easy to use, manim possesses the opposite trait: it is extremely functional, but notoriously difficult to use. Peeps presents a nice balance between functionality and ease-of-use.
## Benefits
- It's highly documented. Almost every single class/function contains detailed documentation of its inner workings.
- Everything is rendered in 3D, which avoids any need to offer separate functionality for 2D and 3D scenes.
- It takes advantage of all the built-in functionality in Blender 2.80, including a GUI that illustrates what rendered animations would look like without actually rendering any videos. This rapid feedback makes coding animations with peeps very fast compared to alternative methods.
## Drawbacks
- It requires many dependencies in order to get set up properly: namely, Blender 2.80, Python 3.7, FFmpeg, and (optional, but recommended) LaTeX. Many older computers won't support Blender 2.80, in which case, peeps is useless.
- It requires some minimal working knowledge of the Blender interface. There are many free tutorials for Blender available, including [this playlist](https://github.com/hmomin/peeps/blob/master/https://www.youtube.com/playlist?list=PLa1F2ddGya_-UvuAqHAksYnB0qL9yWDO6). Just the first five videos in this playlist are more than enough to get up to speed. Additionally, to get the most out of peeps, the stronger your working knowledge of Python, the better off you will be.
# Installation on Windows
## Installing Blender
The ability to use peeps is dependent on your computer's ability to run Blender 2.80. I HIGHLY recommend you use Blender 2.80, specifically. The shift from 2.7 to 2.8 completely changed the built-in Python API, so older versions are a definite no-go. Additionally, I have tested peeps on Blender versions 2.81-2.83 and ran into unexpected import errors that were difficult to debug. You can download an msi for the 2.80 version [here](https://github.com/hmomin/peeps/blob/master/https://download.blender.org/release/Blender2.80/).
### Configuring Startup Behavior
After that, there are some optional things you can do that will make your life easier, especially if you've never used Blender before. You will want to navigate to
```
C:\Users\
\AppData\Roaming\Blender Foundation\Blender\2.80\config
```
and replace `startup.blend` and `userpref.blend` with the corresponding files in this repository. This will provide you with all the custom settings I use in Blender that are conducive to scripting animations. If you can't see the `AppData` folder, you may need to [enable viewing hidden folders](https://github.com/hmomin/peeps/blob/master/https://support.microsoft.com/en-us/help/4028316/windows-view-hidden-files-and-folders-in-windows-10).

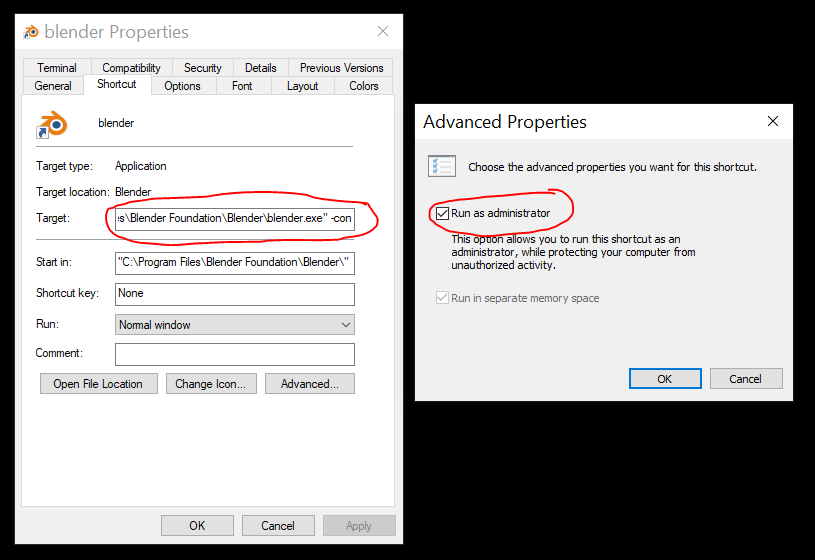
Once you've done that, if you have a designated shortcut for Blender that you would like to use, right-click the shortcut and click on `Properties`. Then, in the `Shortcut` tab, go to the field labeled `Target` and at the end of it, append a `" -con"` without the quotes, as in the image below. This will ensure the Blender console (an extremely useful printing/debugging tool) opens with the GUI by default everytime you run Blender. Also, if you would like to use LaTeX (recommended), click on `Advanced...` and make sure `Run as administrator` is checked. This will allow you to render LaTeX directly through Blender.
## Installing Python
Peeps has only been tested on Python 3.7.3, so any other version of Python 3 should be used at your own risk. I can't imagine anything going horribly wrong, but just wanted to get that off my chest. You can download and install Python 3.7.3 [here](https://github.com/hmomin/peeps/blob/master/https://www.python.org/downloads/windows/). Be sure to check `Add Python to PATH` when installing.
## Installing FFmpeg
Download and install FFmpeg [here](https://github.com/hmomin/peeps/blob/master/https://ffmpeg.org/download.html) by navigating to the `Get packages & executable files` for Windows and click one of the links for Windows builds. From there, unzip the zipped build into a folder and move it into a directory that will never change. Copy the address of the `bin` folder within the unzipped FFmpeg folder (this is where `ffmpeg.exe` lives) and add it to `Path` within your system environment variables, as shown below.

## Installing LaTeX
If you would like to do any text-based animation in peeps, you will need to install LaTeX. I recommend doing this through [MiKTeX](https://github.com/hmomin/peeps/blob/master/https://miktex.org/download). Go to the link, download the installer, and run it as an administrator.
Proceed with the following steps within the installer: 1) accept the terms, 2) choose `Download MiKTeX`, 3) choose `Complete MiKTeX`, 4) choose any server to download the MiKTeX distribution (I would probably go with the top one), 5) download the distribution into a directory that won't change and allow the (lengthy) download to complete.
Once that's finished, close and reopen the same installer and follow these steps: 1) accept the terms, 2) choose `Install MiKTeX`, 3) choose `Complete MiKTeX`, 4) decide whether or not you want other users on your computer to be able to use MiKTeX, 5) proceed with the default options and complete the installation.
## Installing peeps
Finally, we're ready to install peeps! Open a terminal window and `cd` into the directory you'd like to install peeps in. Perform the following commands in the directory:
```
git clone https://github.com/hmomin/peeps.git
pip3 install -r requirements.txt
```
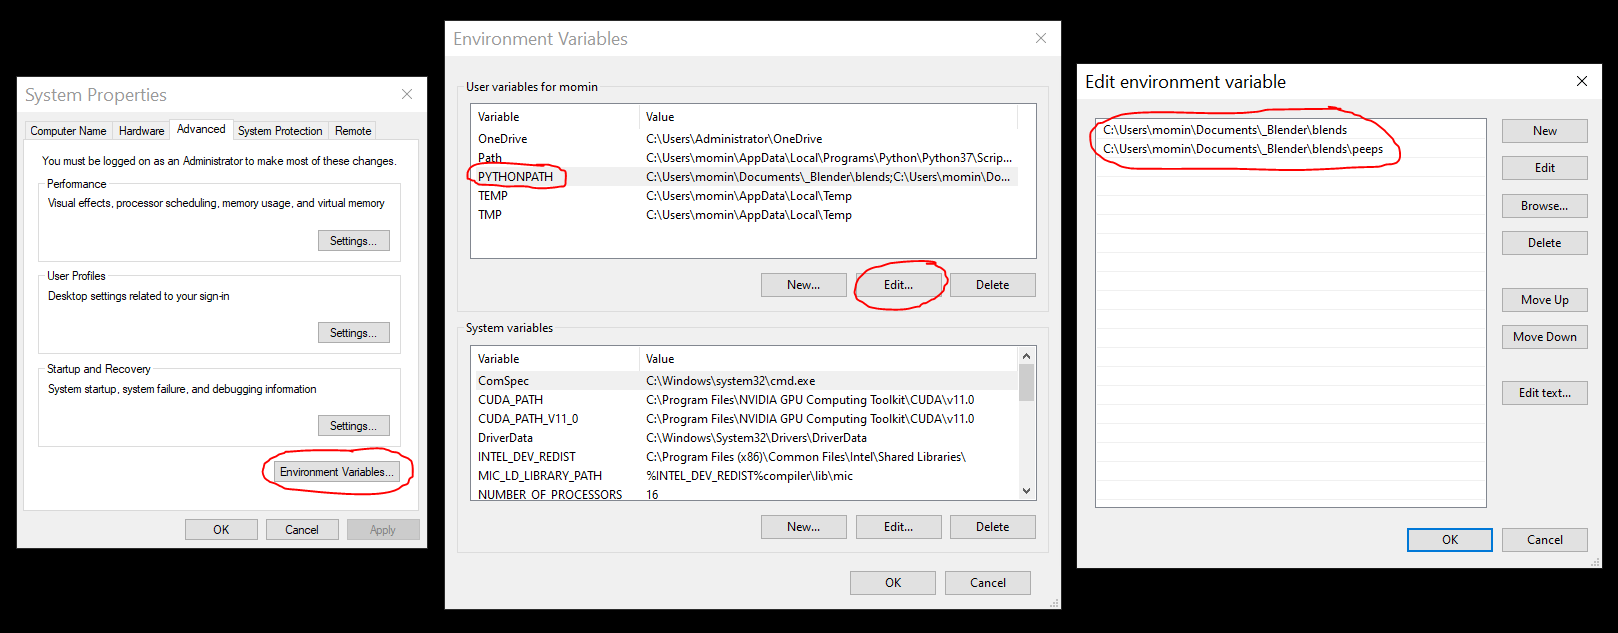
The first will install peeps and the second will install other necessary Python packages. You will also need to navigate to your environment variables and add a user variable called `PYTHONPATH` with a value of the directory containing peeps as well as the path for the peeps folder itself, each separated by a semicolon (see image below). This just tells Python where to look for the peeps module and its child modules.
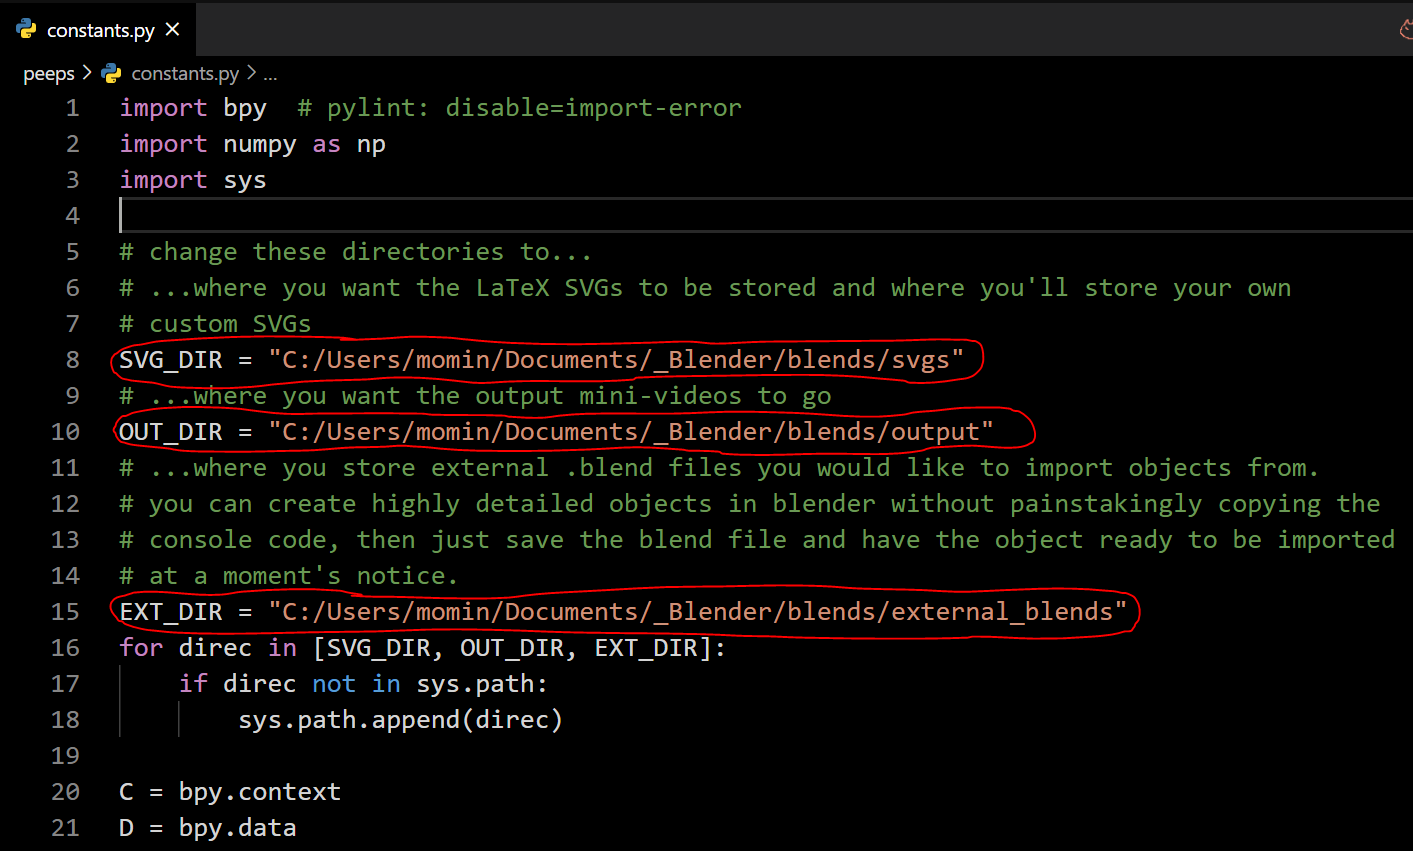
The last step before we get rollin' is to open the `constants.py` file in an editor and change `SVG_DIR`, `OUT_DIR`, and `EXT_DIR` to be wherever you want LaTeX SVG's stored, where you want output renders stored, and where you will store external .blend files containing complicated objects, respectively.
# Trying Out Your First Script
We're finally ready to start animating! Choose a directory to place your Blender scripts and make a new `.py` file with the following content:
```python
import importlib
import peeps
importlib.reload(peeps)
from peeps import *
(start_time, f, cam) = script_init(__file__, False)
def intro():
t1 = TextHelvetica("it works!")
f.play([t1.titleIn])
return end_scene(f, dir(), inspect.stack(), False)
intro()
script_terminate(start_time)
```
Let's go over what all this means. The beginning of each script should contain an import for peeps; you will have to reload it with `importlib`, because Blender is special like that. From there, you'll want to grab the starting time for timing purposes (`start_time`), the Frame object for this script (`f`), and the camera (`cam`), while initializing the script:
```python
import importlib
import peeps
importlib.reload(peeps)
from peeps import *
(start_time, f, cam) = script_init(__file__, False)
```
Passing in `False` to `script_init()` will prevent any renders from being output (probably a good idea if you're in the middle of writing your script). Once you're all done with your script, you can change that `False` to `True`, run the script, and Blender will render all animations as mini-videos that you can then stitch together in your favorite video-editing software.
At the end of your script, it helps to have
```python
script_terminate(start_time)
```
to give you a gauge for the amount of time your script ran for. Everything in between is the bread and butter of the script:
```python
def intro():
t1 = TextHelvetica("it works!")
f.play([t1.titleIn])
return end_scene(f, dir(), inspect.stack(), False)
intro()
```
Here, we're creating a `TextHelvetica` object and animating it in with the `titleIn()` function. At the end of each scene (wrapped in a function), I like to call `end_scene()`, which gives me a gauge for what variables are still on the stack. Passing in `False` as the last argument will avoid clearing the entire scene, while passing in `True` will give you a fresh start for the next scene.
## Running the Script
So that explains the script, but... how the heck do we run it?! Open up Blender and while hovering over the menu just above the black box (formally, the text editor), scroll your mouse wheel until you see the `Open` option. Click it and navigate into where you just saved your first script and open it up. You should now see your script in the Blender text editor.

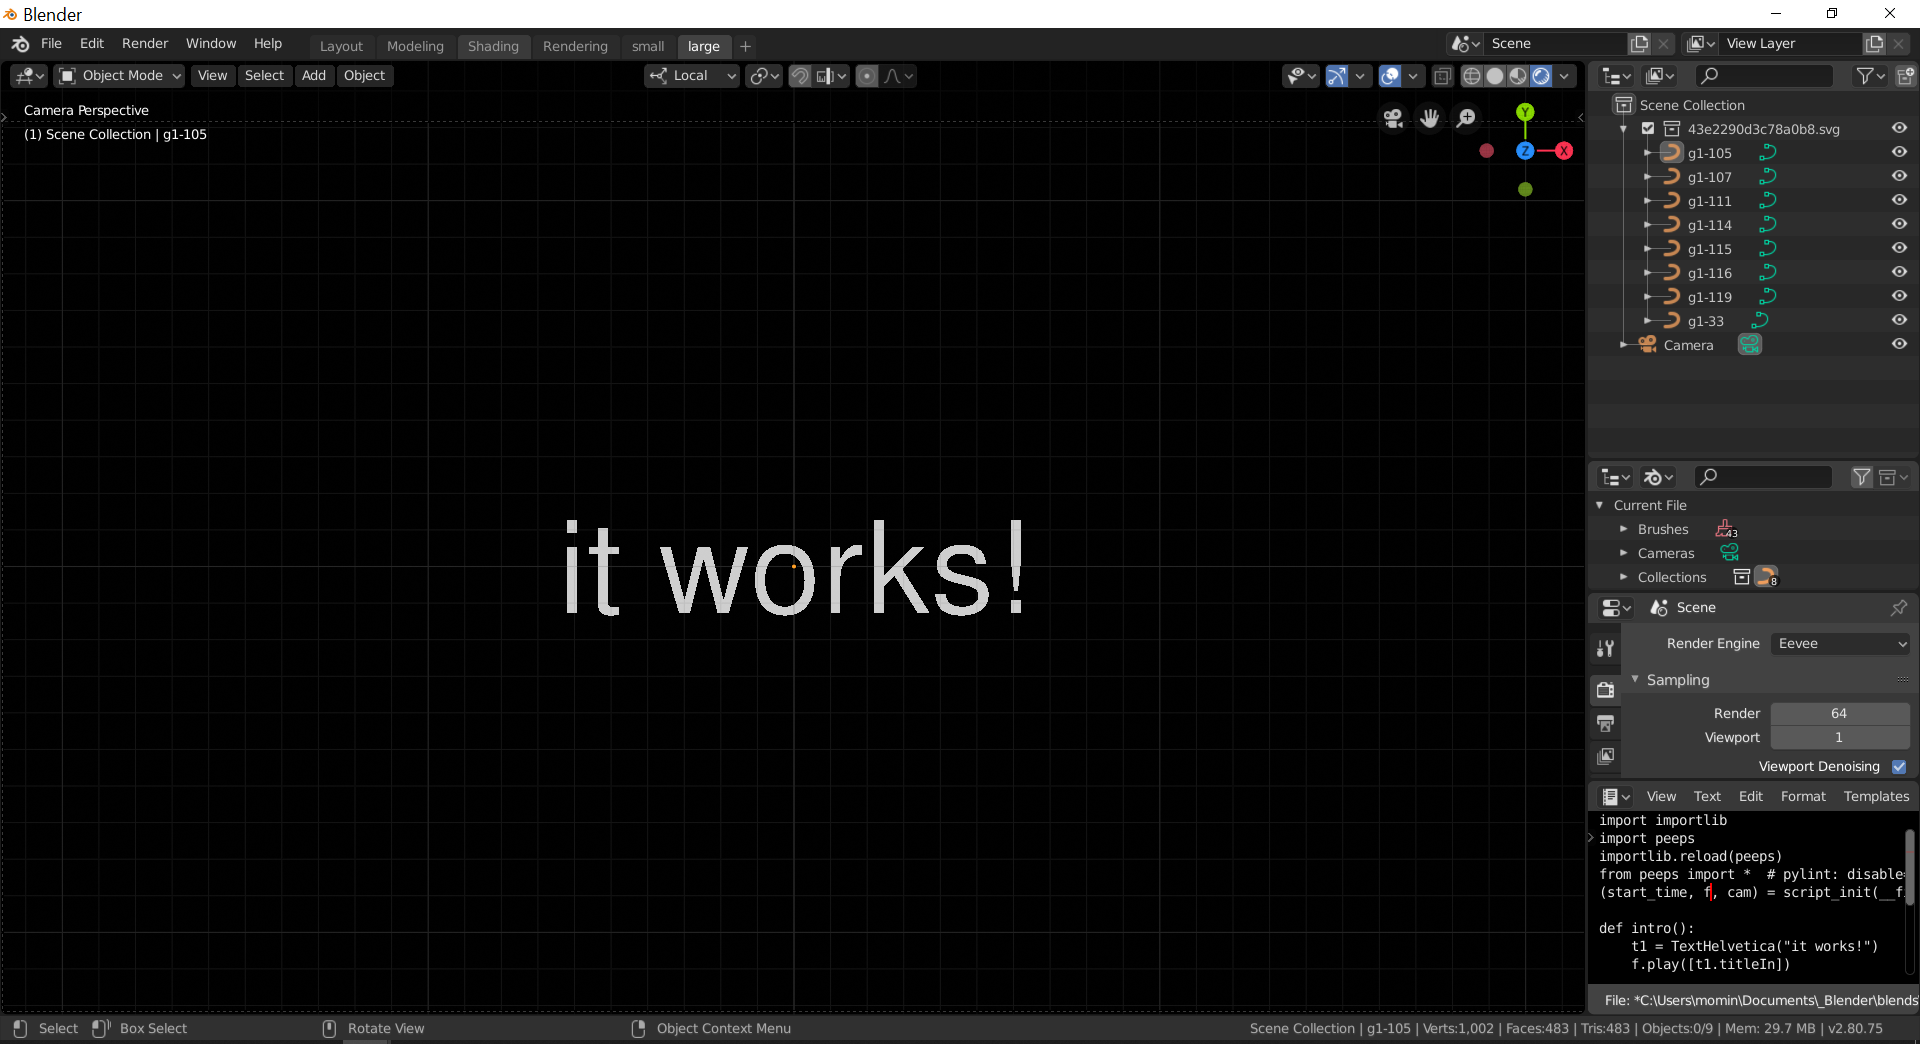
Now, if you followed my recommendation above regarding replacing the default `userpref.blend`, you can use the keyboard shortcut `Alt+F` while hovering your mouse within the Blender text editor to run your script. Alternatively, you can scroll all the way to the end of the editor menu and click `Run Script`. You should now see the following on your screen:
## Rendering Animations
Exciting! We've come a long way, but how do we take this to the finish line? What we see on the screen here is the end result of calling `titleIn()` on `t1`, but we haven't actually seen the animated sequence of the letters flipping in. The only way to do that is to render out the animation called by `f.play()` into a video. To do this, simply change the call to `script_init()` by either removing the last `False` altogether or changing it to `True` in your favorite external editor:
```python
(start_time, f, cam) = script_init(__file__)
```
To reload the script into Blender, hover over the Blender text editor and apply the keyboard shortcut `Alt+R` twice to reload the script and then `Alt+F` to run it again. This time, you'll notice Blender will freeze up. If you look at the Blender console, which is the second Blender window separate from the GUI, you'll see some `Saved` messages start to pop up like this:
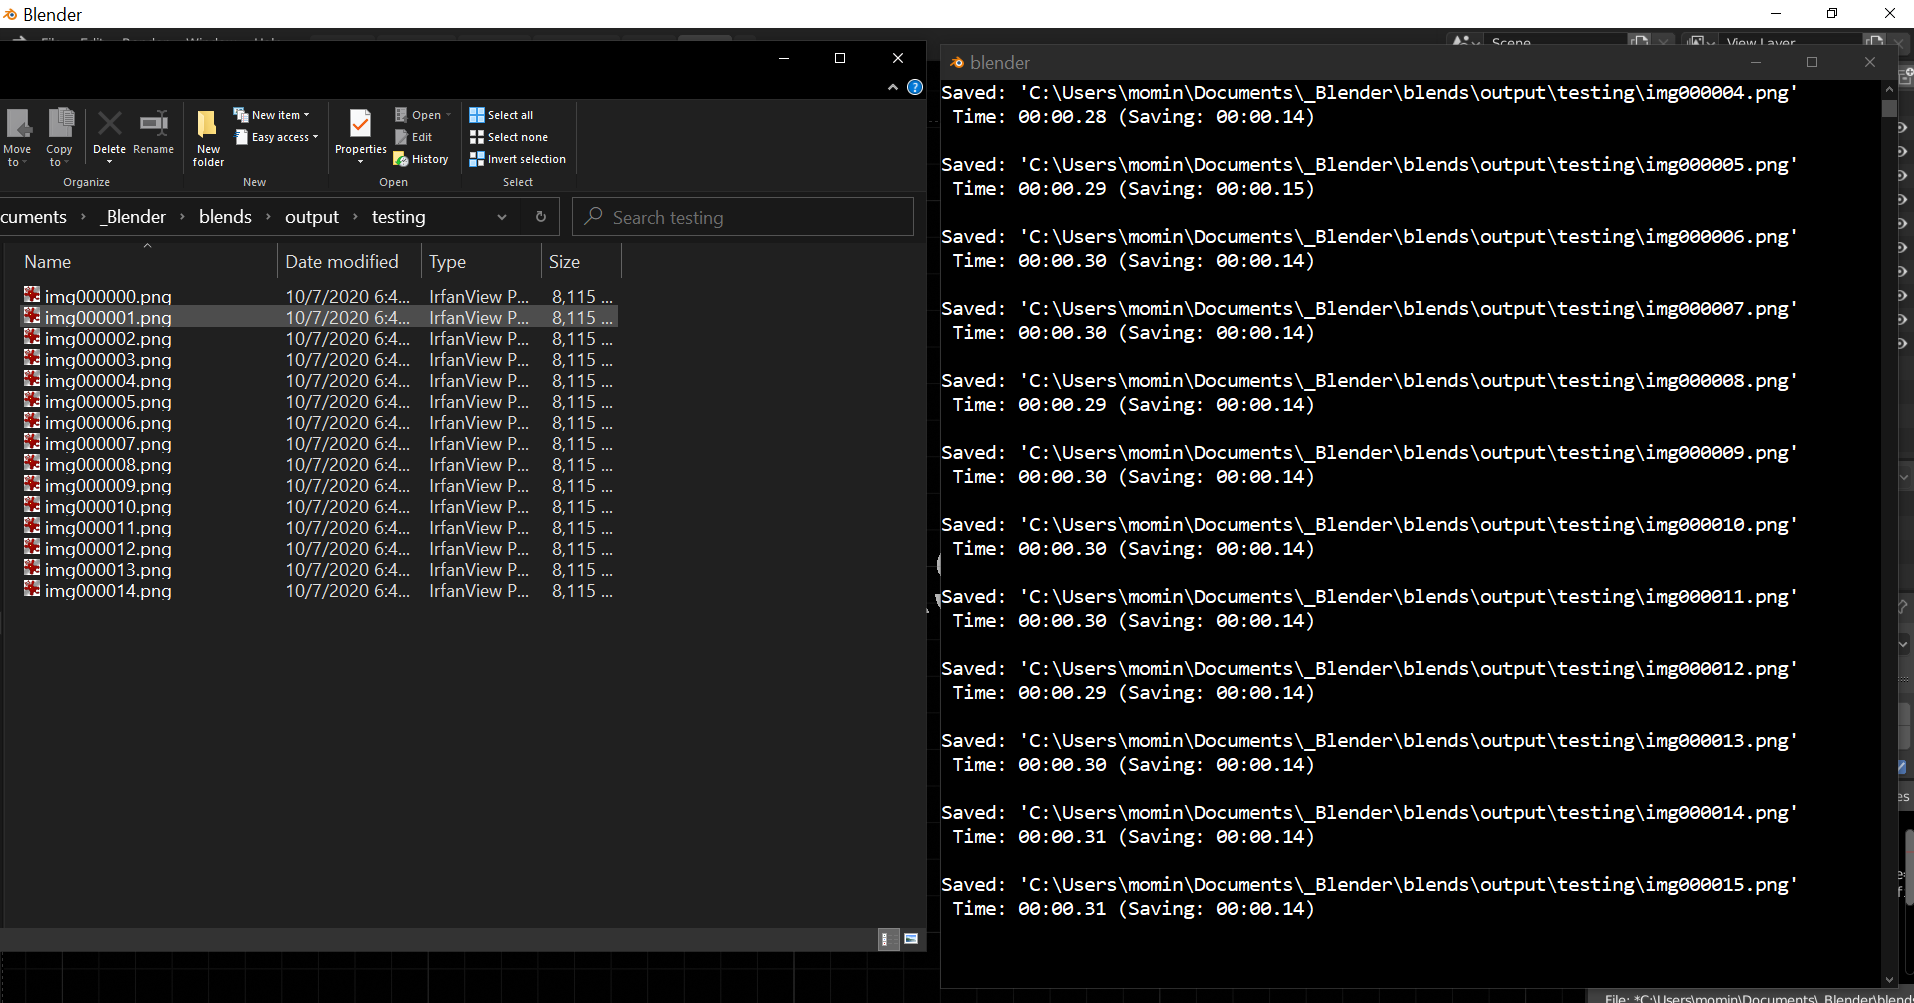
Images of each frame are now physically being rendered from Blender onto your hard drive at the `OUT_DIR` directory. Once all the frames of each animation have been created, peeps will run `ffmpeg` on the frames to concatenate them all into a video and then delete the individual frames. It might take a minute or two to complete, but by the end of it, you'll have yourself [one snazzy animation](https://github.com/hmomin/peeps/blob/master/https://dr3ngl797z54v.cloudfront.net/peeps/11_sample_video.mp4)!
# Going Beyond the Basics
If you were able to render out that animation video, then all components were successfully installed, meaning you can move on to bigger and better animations! I have prepared some sample scripts that go beyond the basics to produce more elaborate, elegant animations. Feel free to step through them by commenting all the lines out and adding them in one-by-one to see how they work. Also, don't forget that to render out actual videos, you'll have to change the initializing function call to `script_init(__file__)`.
Alternatively, you can take a peek into the documentation for objects/functions in the library files. I recommend starting in this order:
1. frame.py (this will give you a good idea of how videos are created and how animation syntax works)
2. blobjects/blobject.py (this will give you a good idea of what kinds of functions you can call on individual objects - virtually every object derives from Blobject so, in theory, you can call any of these functions on any object)
3. blobjects/shapes.py (this will show you some kinds of objects you can instantiate with peeps)
# Contributing
I welcome any pull requests that improve the overall workings/readability of the library. Additionally, I don't own a Mac, so I would seriously appreciate some brave soul(s) attempting to install and run all this on a Mac to pick out any kinks related specifically to Mac installation.
# License
All files in the repository are under the MIT license.
近期下载者:
相关文件:
收藏者: