esp32-fan-controller
说明: ESP32风扇控制器,带温度传感器和MQTT,
(ESP32 fan controller with temperature sensor and MQTT,)
(ESP32 fan controller with temperature sensor and MQTT,)
文件列表:
.travis.yml (1624, 2023-12-18)
include/ (0, 2023-12-18)
platformio.ini (908, 2023-12-18)
src/ (0, 2023-12-18)
src/OTA.cpp (3373, 2023-12-18)
src/OTA.h (39, 2023-12-18)
src/config.h (35459, 2023-12-18)
src/config_override_example.h (1709, 2023-12-18)
src/fanPWM.cpp (2146, 2023-12-18)
src/fanPWM.h (302, 2023-12-18)
src/fanTacho.cpp (1377, 2023-12-18)
src/fanTacho.h (70, 2023-12-18)
src/log.cpp (2189, 2023-12-18)
src/log.h (761, 2023-12-18)
src/main.cpp (2932, 2023-12-18)
src/mqtt.cpp (12856, 2023-12-18)
src/mqtt.h (735, 2023-12-18)
src/sensorBME280.cpp (2204, 2023-12-18)
src/sensorBME280.h (130, 2023-12-18)
src/temperatureController.cpp (3114, 2023-12-18)
src/temperatureController.h (402, 2023-12-18)
src/tft.cpp (19582, 2023-12-18)
src/tft.h (1910, 2023-12-18)
src/tftTouch.cpp (3811, 2023-12-18)
src/tftTouch.h (56, 2023-12-18)
src/wifiCommunication.cpp (6344, 2023-12-18)
src/wifiCommunication.h (197, 2023-12-18)
# ESP32 fan controller with MQTT support
This project describes how to use an ESP32 microcontroller for controlling a 4 pin fan (pwm controlled fan). Main features are:
* mode 1 (fan mode or pwm mode): directly setting fan speed via pwm signal
* mode 2 (climate mode or temperature controller mode): fan speed automatically increases if temperature is getting close to or higher than target temperature. Of course temperature can never get lower than air temperature of room.
* measurement of fan speed via tacho signal
* measurement of ambient values via BME280: temperature, humidity, pressure
* support of MQTT
* support of OTA (over the air updates of firmware). Please see Wiki: 07 OTA Over the air updates
* TFT display for showing status information, different resolutions supported (tested with 320x240 and 160x128)
* TFT touch display for setting pwm or target temperature
* optional: integration into home automation software Home Assistant (with MQTT discovery) or openHAB.
Even if you don't want to use all of these features, the project can hopefully easily be simplified or extended. With some minor modifications an ESP8266 / D1 mini should be usable.
I did this project for having an automatic temperature controller for my 3D printer housing. But of course at least the ideas used here could be used for many other purposes.
For more information please see the Wiki
## Integration in Home Assistant
With mqtt discovery, you can integrate the fan controller with almost no effort in Home Assistant.

 Please see Wiki: 05 Home Assistant
## Operation modes
You can operate the ESP32 fan controller mainly in two different modes, depending on your needs:
mode | description | how to set PWM | how to set actual temperature | how to set target temperature
------------ | ------------- | ------------- | ------------- | -------------
fan mode | fan speed directly set via PWM signal | MQTT, touch or both | BME280 (optional, only used for information) |
climate mode | automatic temperature control
Please see Wiki: 05 Home Assistant
## Operation modes
You can operate the ESP32 fan controller mainly in two different modes, depending on your needs:
mode | description | how to set PWM | how to set actual temperature | how to set target temperature
------------ | ------------- | ------------- | ------------- | -------------
fan mode | fan speed directly set via PWM signal | MQTT, touch or both | BME280 (optional, only used for information) |
climate mode | automatic temperature control
fan speed is automatically set depending on difference between target temperature and actual temperature | | MQTT or BME280 | MQTT, touch or both In both modes, a TFT panel can optionally be used for showing status information from the fan, ambient (BME280: temperature, humidity, pressure) and the chosen target temperature. Different resolutions of the TFT panel are supported, layout will automatically be adapted (tested with 320x240 and 160x128). If you use a TFT touch panel, you can set the PWM value or target temperature via the touch panel (otherwise you have to use MQTT). For more information please see the Wiki: 03 Examples - operation modes and breadboards ## Wiring diagram for fan and BME280  For more information please see the Wiki: 01 Wiring diagram ## Part list Function | Parts | Remarks | approx. price ------------ | ------------- | ------------- | ------------- mandatory microcontroller | ESP32 | e.g. from AZ-Delivery | 8 EUR fan | 4 pin fan (4 pin means pwm controlled), 5V or 12V | tested with a standard CPU fan and a Noctua NF-F12 PWM
for a list of premium fans see https://noctua.at/en/products/fan | 20 EUR for Noctua measuring tacho signal of fan | - pullup resistor 10 kΩ
- RC circuit: resistor 3.3 kΩ; ceramic capacitor 100 pF power supply | - 5V for ESP32, 5V or 12V for fan (depending on fan)
or
-12V when using AZ-touch (see below) | e.g. with 5.5×2.5 mm coaxial power connector | 12 EUR optional temperature sensor | - BME280
- 2 pullup resistors 3.3 kΩ (for I2C) | e.g. from AZ-Delivery | 6.50 EUR optional TFT display (non touch) | 1.8 inch 160x128, ST7735 | e.g. from AZ-Delivery | 6.80 EUR TFT touch display with ESP32 housing | AZ-touch from AZ delivery
including voltage regulator and TFT touch display (2.8 inch 320x240, ILI9341, XPT2046) | e.g. from AZ-Delivery
(you can also use the older 2.4 inch ArduiTouch)| 30 EUR connectors for detaching parts from AZ-touch | - e.g. 5.5×2.5 mm coaxial power connector male
- JST-XH 2.54 mm for BME280
- included extra cables and connectors in case of Noctua fan Other TFTs can most likely easily be used, as long as there is a library from Adafruit for it. If resolution is smaller than 160x128 it might be necessary to change the code in file tft.cpp. Anything bigger should automatically be rearranged. If you want to use touch, your TFT should have the XPT2046 chip to use it without any code change. ## Software installation If you're only used to the Arduino IDE, I highly recommend having a look at PlatformIO IDE. While the Arduino IDE is sufficient for flashing, it is not very comfortable for software development. There is no syntax highlighting and no autocompletion. All the needed libraries have to be installed manually, and you will sooner or later run into trouble with different versions of the same library. This cannot happen with PlatformIO. All libraries will automatically be installed into the project folder and cannot influence other projects. If you absolutely want to use the Arduino IDE, please have look at the file "platformio.ini" for the libraries needed. For installing PlatformIO IDE, follow this guide. It is as simple as: * install VSCode (Visual Studio Code) * install PlatformIO as an VSCode extension * clone this repository or download it * use "open folder" in VSCode to open this repository * check settings in "config.h" * upload to ESP32 ## Images ### ArduiTouch running in "climate mode" 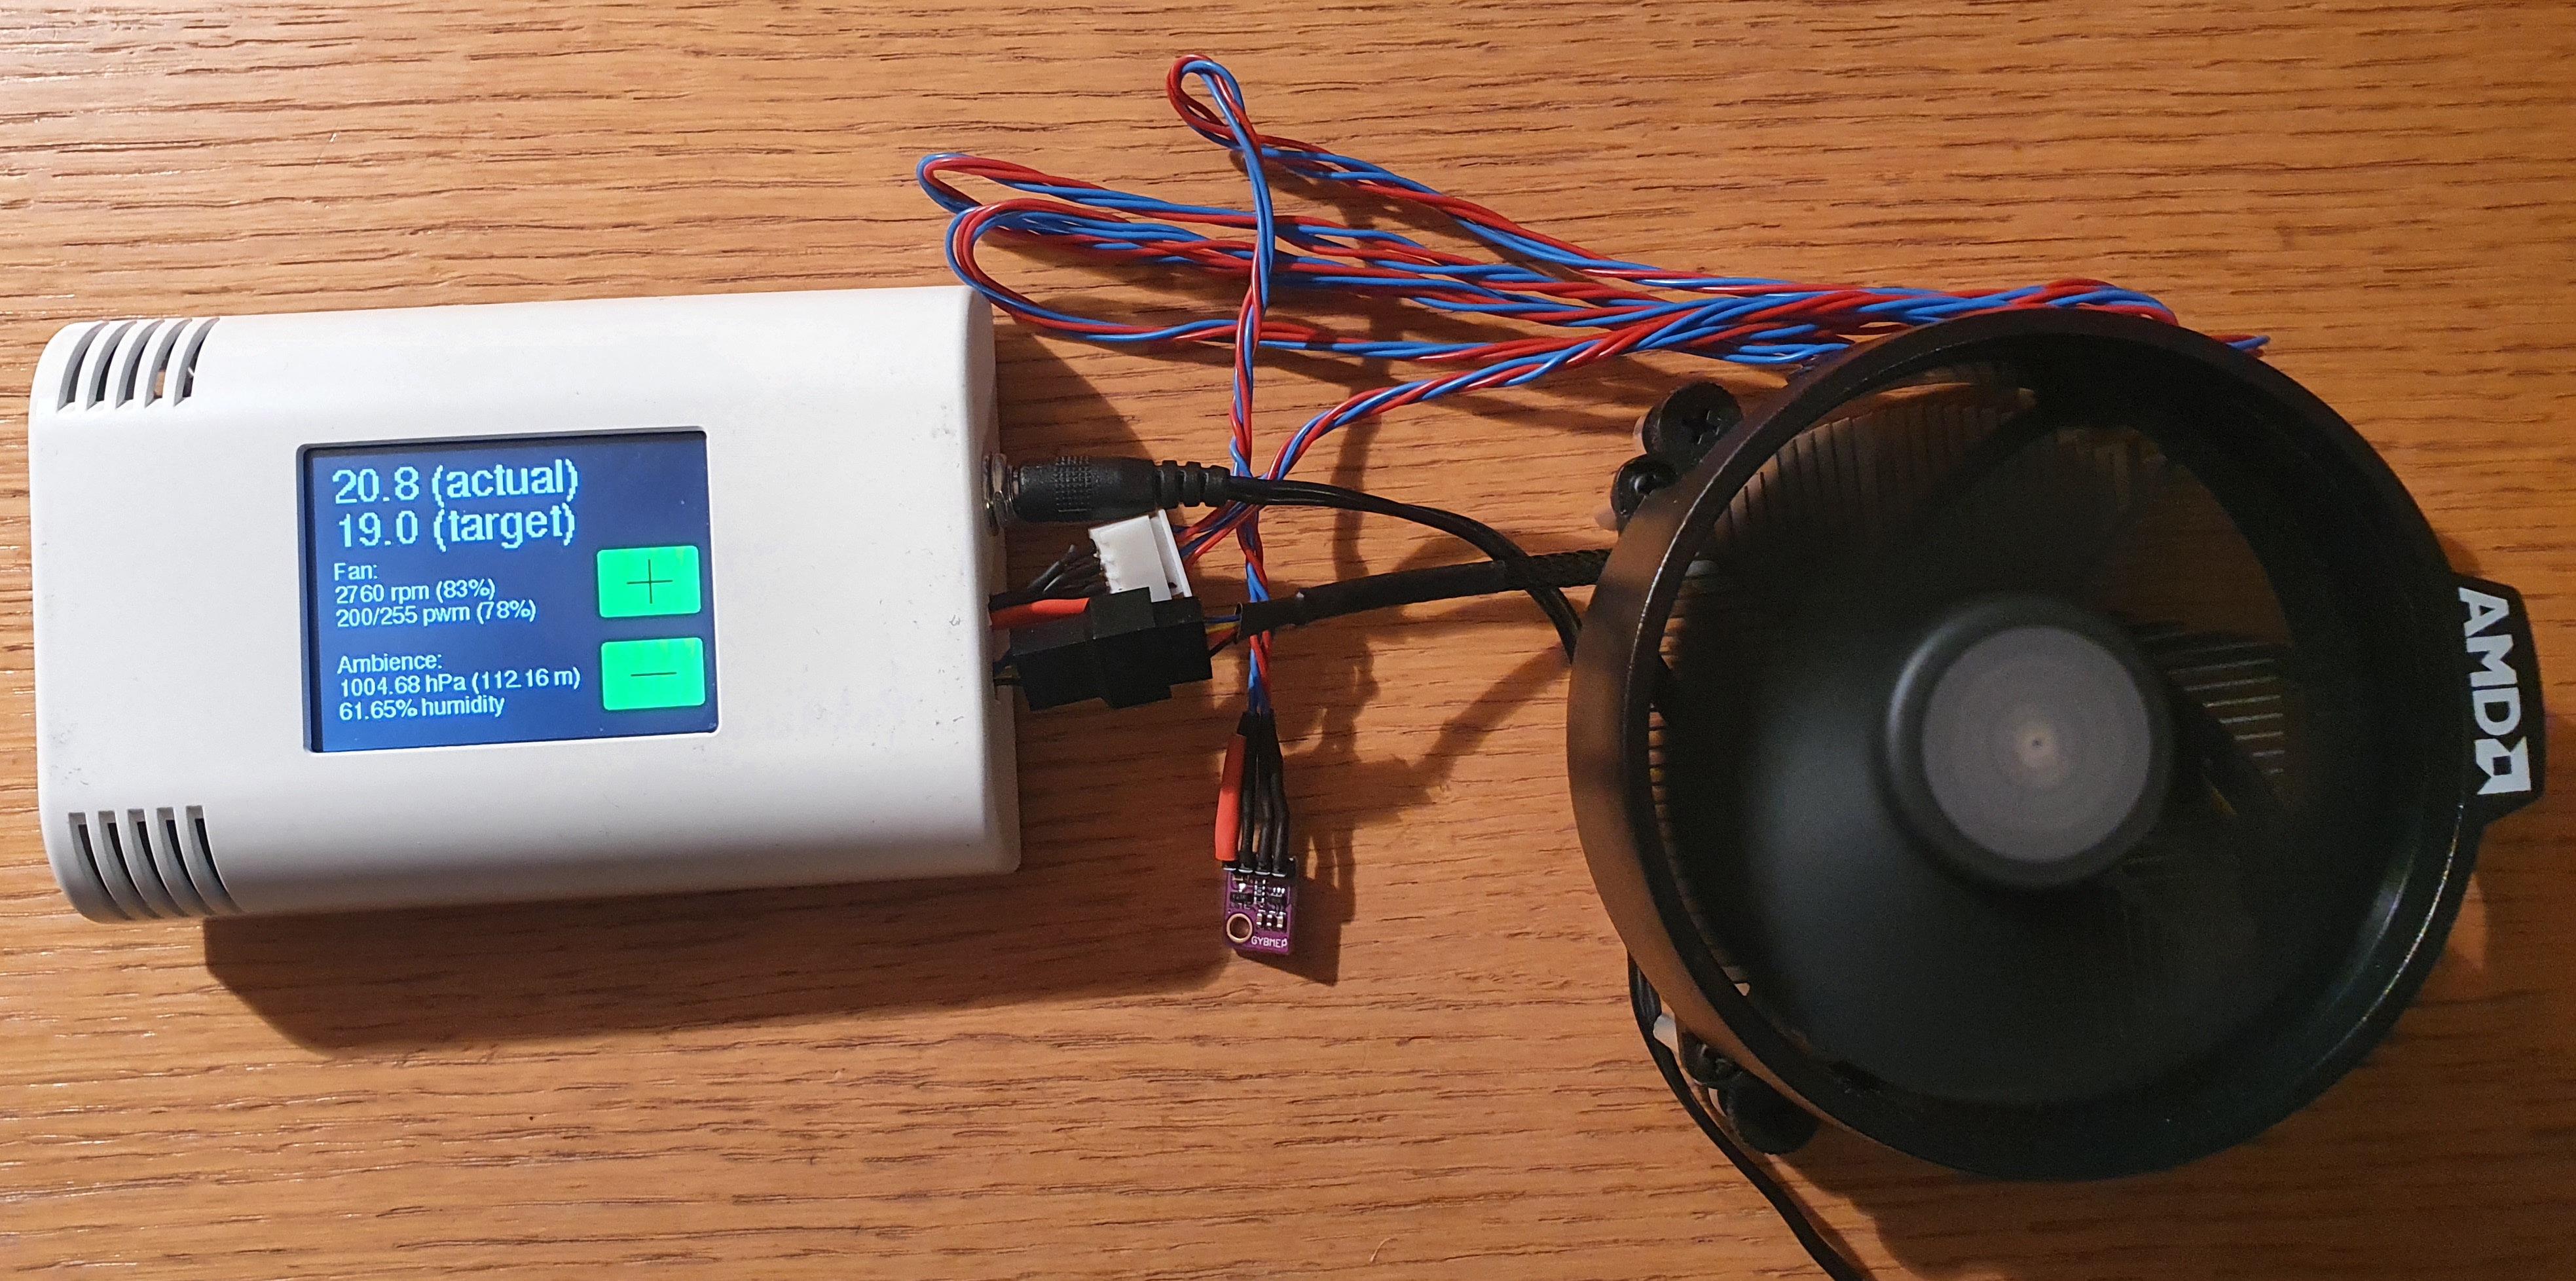 ### Images of ESP32 fan controller used in a 3D printer housing  For more information please see the Wiki: 04 AZ‐touch / ArduiTouch
Please see Wiki: 05 Home Assistant
## Operation modes
You can operate the ESP32 fan controller mainly in two different modes, depending on your needs:
mode | description | how to set PWM | how to set actual temperature | how to set target temperature
------------ | ------------- | ------------- | ------------- | -------------
fan mode | fan speed directly set via PWM signal | MQTT, touch or both | BME280 (optional, only used for information) |
climate mode | automatic temperature controlfan speed is automatically set depending on difference between target temperature and actual temperature | | MQTT or BME280 | MQTT, touch or both In both modes, a TFT panel can optionally be used for showing status information from the fan, ambient (BME280: temperature, humidity, pressure) and the chosen target temperature. Different resolutions of the TFT panel are supported, layout will automatically be adapted (tested with 320x240 and 160x128). If you use a TFT touch panel, you can set the PWM value or target temperature via the touch panel (otherwise you have to use MQTT). For more information please see the Wiki: 03 Examples - operation modes and breadboards ## Wiring diagram for fan and BME280  For more information please see the Wiki: 01 Wiring diagram ## Part list Function | Parts | Remarks | approx. price ------------ | ------------- | ------------- | ------------- mandatory microcontroller | ESP32 | e.g. from AZ-Delivery | 8 EUR fan | 4 pin fan (4 pin means pwm controlled), 5V or 12V | tested with a standard CPU fan and a Noctua NF-F12 PWM
for a list of premium fans see https://noctua.at/en/products/fan | 20 EUR for Noctua measuring tacho signal of fan | - pullup resistor 10 kΩ
- RC circuit: resistor 3.3 kΩ; ceramic capacitor 100 pF power supply | - 5V for ESP32, 5V or 12V for fan (depending on fan)
or
-12V when using AZ-touch (see below) | e.g. with 5.5×2.5 mm coaxial power connector | 12 EUR optional temperature sensor | - BME280
- 2 pullup resistors 3.3 kΩ (for I2C) | e.g. from AZ-Delivery | 6.50 EUR optional TFT display (non touch) | 1.8 inch 160x128, ST7735 | e.g. from AZ-Delivery | 6.80 EUR TFT touch display with ESP32 housing | AZ-touch from AZ delivery
including voltage regulator and TFT touch display (2.8 inch 320x240, ILI9341, XPT2046) | e.g. from AZ-Delivery
(you can also use the older 2.4 inch ArduiTouch)| 30 EUR connectors for detaching parts from AZ-touch | - e.g. 5.5×2.5 mm coaxial power connector male
- JST-XH 2.54 mm for BME280
- included extra cables and connectors in case of Noctua fan Other TFTs can most likely easily be used, as long as there is a library from Adafruit for it. If resolution is smaller than 160x128 it might be necessary to change the code in file tft.cpp. Anything bigger should automatically be rearranged. If you want to use touch, your TFT should have the XPT2046 chip to use it without any code change. ## Software installation If you're only used to the Arduino IDE, I highly recommend having a look at PlatformIO IDE. While the Arduino IDE is sufficient for flashing, it is not very comfortable for software development. There is no syntax highlighting and no autocompletion. All the needed libraries have to be installed manually, and you will sooner or later run into trouble with different versions of the same library. This cannot happen with PlatformIO. All libraries will automatically be installed into the project folder and cannot influence other projects. If you absolutely want to use the Arduino IDE, please have look at the file "platformio.ini" for the libraries needed. For installing PlatformIO IDE, follow this guide. It is as simple as: * install VSCode (Visual Studio Code) * install PlatformIO as an VSCode extension * clone this repository or download it * use "open folder" in VSCode to open this repository * check settings in "config.h" * upload to ESP32 ## Images ### ArduiTouch running in "climate mode"  ### Images of ESP32 fan controller used in a 3D printer housing  For more information please see the Wiki: 04 AZ‐touch / ArduiTouch
近期下载者:
相关文件:
收藏者: