homegenie-mini
所属分类:机器人/智能制造
开发工具:C++
文件大小:0KB
下载次数:0
上传日期:2019-02-23 13:29:04
上 传 者:
sh-1993
说明: 用于家庭自动化和物联网应用的可编程智能设备。,
(Programmable smart device for Home Automation and IoT applications.,)
文件列表:
.idea/ (0, 2023-12-30)
.idea/encodings.xml (135, 2023-12-30)
.idea/homegenie-mini.iml (262, 2023-12-30)
.idea/misc.xml (601, 2023-12-30)
.idea/serialmonitor_settings.xml (179, 2023-12-30)
.idea/vcs.xml (167, 2023-12-30)
.idea/watcherTasks.xml (1212, 2023-12-30)
CMakeLists.txt (2998, 2023-12-30)
CMakeListsPrivate.txt (5437, 2023-12-30)
LICENSE (612, 2023-12-30)
data/ (0, 2023-12-30)
data/images/ (0, 2023-12-30)
data/images/phone/ (0, 2023-12-30)
data/images/phone/hg_panel_dashboard.png (55804, 2023-12-30)
data/images/phone/hg_panel_discovery.png (35917, 2023-12-30)
data/images/phone/hg_panel_discovery_select.png (61860, 2023-12-30)
data/images/phone/hg_server_dashboard.png (61716, 2023-12-30)
data/images/phone/hg_server_mqtt_config.png (28612, 2023-12-30)
data/web/ (0, 2023-12-30)
examples/ (0, 2023-12-30)
examples/playground/ (0, 2023-12-30)
examples/playground/configuration.h (0, 2023-12-30)
examples/playground/playground.cpp (1945, 2023-12-30)
examples/rf-transceiver/ (0, 2023-12-30)
examples/rf-transceiver/api/ (0, 2023-12-30)
examples/rf-transceiver/api/RCSwitchHandler.cpp (3608, 2023-12-30)
examples/rf-transceiver/api/RCSwitchHandler.h (1911, 2023-12-30)
examples/rf-transceiver/configuration.h (232, 2023-12-30)
examples/rf-transceiver/io/ (0, 2023-12-30)
examples/rf-transceiver/io/RFReceiverConfig.cpp (1331, 2023-12-30)
examples/rf-transceiver/io/RFReceiverConfig.h (1468, 2023-12-30)
... ...
[](https://travis-ci.org/genielabs/homegenie-mini)
# HomeGenie Mini
HomeGenie mini *(code name **Sbirulino**)* is an open hardware + firmware solution for building smart devices
based on the popular *ESP8266 chip*, a WiFi capable micro controller.
[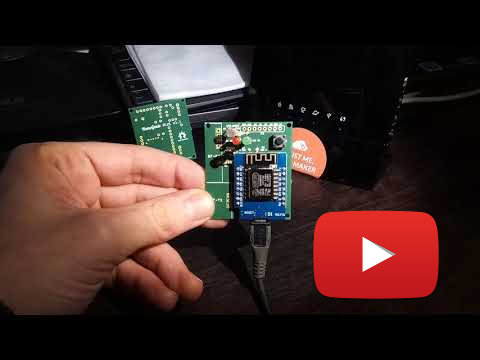](https://youtu.be/CovB1jl3980)
(click the picture above to watch the video)
**Hardware features**
- WPS button for quick WiFi protected setup
- Temperature and light sensors
- RF transceiver (315/330/433Mhz)
- Expansion connector (P1) with 4 GPIO configurable as SPI/DIO/PWM
*Example applications of the P1 connector:*
- control up to 4 relays to actuate lights and appliances (DIO)
- hosting additional sensors, connecting a display or other hardware (SPI)
- control the brightness of a led or drive a motor at different speed (PWM)
- breadboard playground
**Firmware features**
- Automatic discovery (SSDP) for instant client setup
- GPIO mapping to virtual modules: switch for digital output, dimmer for analog output or sensor for inputs (work in progress)
- X10 home automation RF protocol encoding and decoding with mapping to virtual modules
- Modules state persistence
- HTTP API (subset of standard HomeGenie API)
- Real time event stream over WebSocket or SSE connection
- MQTT broker over websocket
- NTP client for time sync
- Scripting engine (work in progress)
- Serial CLI with same API as HTTP
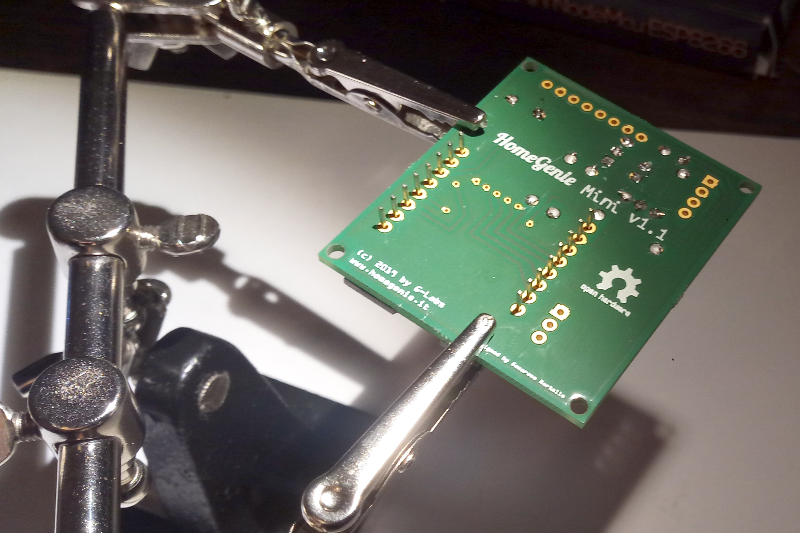
## Assembling a HomeGenie Mini device
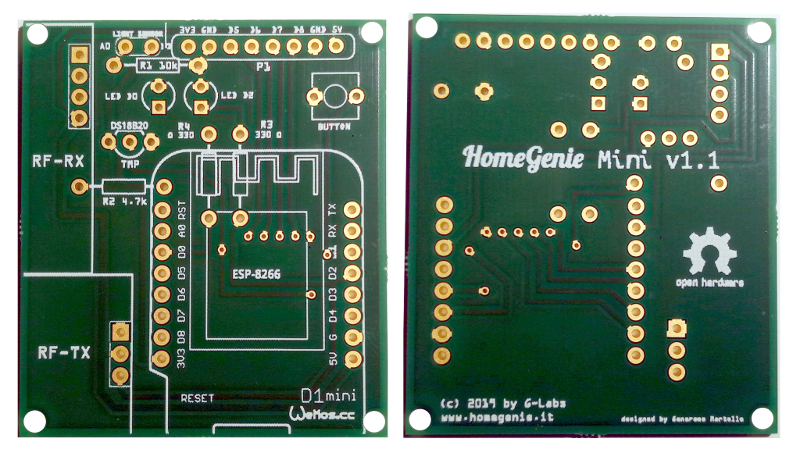
*HomeGenie Mini board front and rear view*
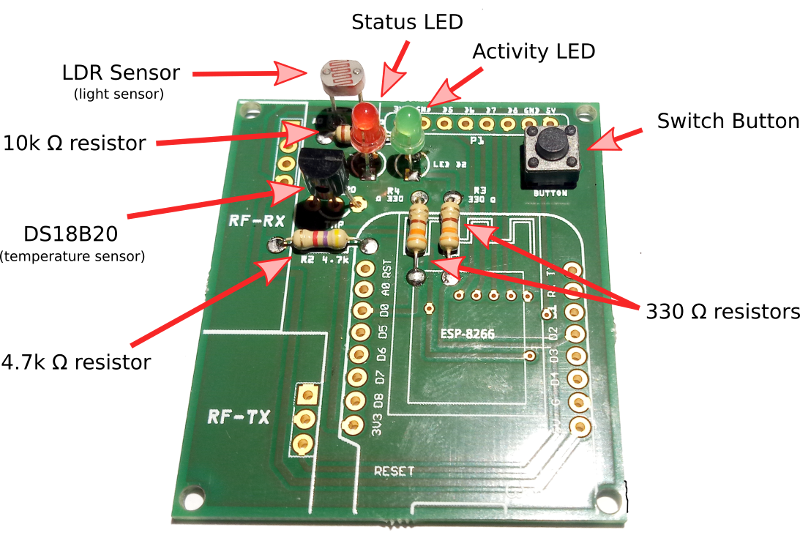
### STEP 1: Start by soldering the 3 resistors, 2 LEDS, light sensor, temperature sensor and the momentary switch button
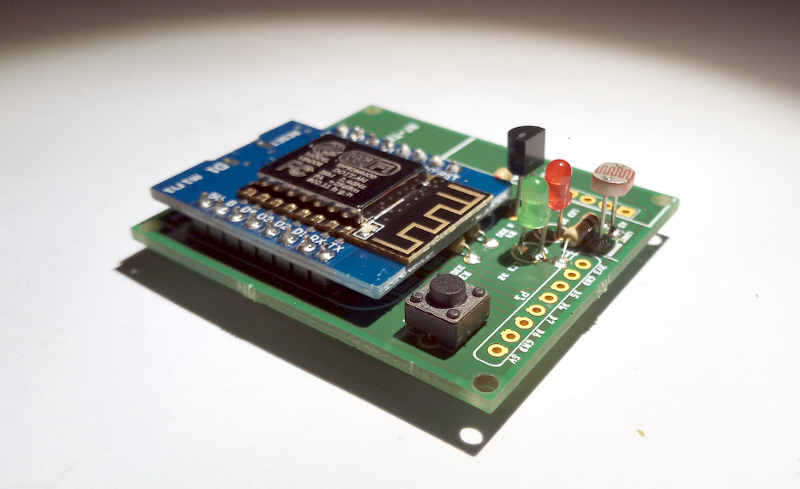
### STEP 2: Solder the header pins to the D1 Mini
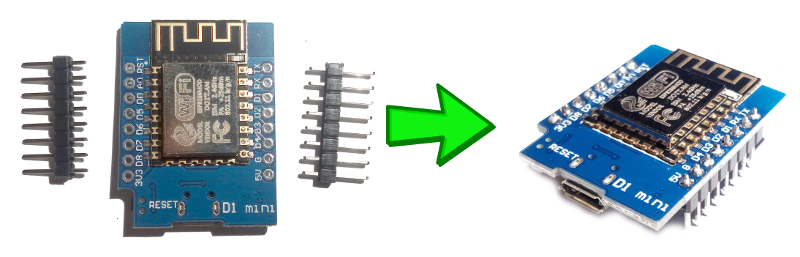
### STEP 3: Solder the D1 Mini to HomeGenie Mini board
### STEP 4: Optionally solder the RF receiver and transmitter: the firmware currently only support X10 home automation protocol. More protocols might be added in the future (any request?).
The picture below shows a basic HomeGenie Mini device **without** the RF transceiver but adding the RF transceiver is easy as solder [two more components](https://www.google.it/search?q=rf+MX-FS-03V+MX-05V+315+433+transmitter-receiver+module).
You can also take advantage of the expansion port (P1) to connect a [relay module](https://www.google.it/search?q=buy+4+or+2+channels+relay+module+arduino) to control lights and appliances or
any other additional sensors/components required for your projects.
## Building and flashing the firmware
HomeGenie Mini firmware is based on **Platform.IO**. You can choose to build firmware
without installing the code editor but just the [Platform.IO core](https://docs.platformio.org/en/latest/installation.html).
After installing *Platform.IO core* you can build the firmware by entering this command:
```
platformio update
platformio lib install
platformio run
```
If you prefer installing the whole IDE follow instructions for [Platform.IO IDE](https://platformio.org/platformio-ide) installation instead.
To install the firmware connect HomeGenie Mini to the USB port of your PC and issue the command:
```
platformio run -t upload
```
**Congratulations!! =)** You've just got a new shiny HomeGenie Mini device up and running.
### HomeGenie API
HomeGenie Mini API is a subset of HomeGenie Server API that makes HomeGenie Mini a real
fully working light version of HomeGenie Server specifically designed for micro controllers.
#### [HomeAutomation.HomeGenie](https://genielabs.github.io/HomeGenie/api/mig/core_api_config.html)
Implemented subset:
- [`/api/HomeAutomation.HomeGenie/Logging/RealTime.EventStream/`](https://genielabs.github.io/HomeGenie/api/mig/core_api_logging.html#1)
- [`/api/HomeAutomation.HomeGenie/Config/Modules.Get`](https://genielabs.github.io/HomeGenie/api/mig/core_api_config.html#2)
- [`/api/HomeAutomation.HomeGenie/Config/Modules.List`](https://genielabs.github.io/HomeGenie/api/mig/core_api_config.html#3)
- [`/api/HomeAutomation.HomeGenie/Config/Groups.List`](https://genielabs.github.io/HomeGenie/api/mig/core_api_config.html#4)
`EXAMPLE Request`
```
GET /api/HomeAutomation.HomeGenie/Config/Modules.Get/HomeAutomation.HomeGenie/mini
```
`Response`
```
{
"Name": "HG-Mini",
"Description": "HomeGenie Mini node",
"DeviceType": "Sensor",
"Domain": "HomeAutomation.HomeGenie",
"Address": "mini",
"Properties": [{
"Name": "Sensor.Luminance",
"Value": "114",
"Description": "",
"FieldType": "",
"UpdateTime": "2019-01-30T13:34:02.293Z"
},{
"Name": "Sensor.Temperature",
"Value": "18.25",
"Description": "",
"FieldType": "",
"UpdateTime": "2019-01-30T13:34:02.293Z"
}],
"RoutingNode": ""
}
```
#### [HomeAutomation.X10](https://genielabs.github.io/HomeGenie/api/mig/mig_api_x10.html)
Implemented subset:
- [`/api/HomeAutomation.X10/
/Control.On`](https://genielabs.github.io/HomeGenie/api/mig/mig_api_x10.html#1)
- [`/api/HomeAutomation.X10//Control.Off`](https://genielabs.github.io/HomeGenie/api/mig/mig_api_x10.html#2)
- [`/api/HomeAutomation.X10//Control.Level`](https://genielabs.github.io/HomeGenie/api/mig/mig_api_x10.html#5)
- [`/api/HomeAutomation.X10//Control.Toggle`](https://genielabs.github.io/HomeGenie/api/mig/mig_api_x10.html#6)
#### HomeGenie Mini specific API
It's possible to control the 4 GPIOs on the `P1` expansion port using the following API:
- `/api/HomeAutomation.HomeGenie//Control.On`
- `/api/HomeAutomation.HomeGenie//Control.Off`
- `/api/HomeAutomation.HomeGenie//Control.Level/`
Where `` can be `D5`, `D6`, `D7` or `D8` and `` a integer between `0` and `100`.
**Examples**
```
# Set output D6 to 50% (1.65V)
/api/HomeAutomation.HomeGenie/D6/Control.Level/50
# Set output D5 to 100% (3.3V)
/api/HomeAutomation.HomeGenie/D5/Control.Level/100
# or
/api/HomeAutomation.HomeGenie/D5/Control.On
# Set output D8 to 0% (0V)
/api/HomeAutomation.HomeGenie/D8/Control.Level/0
# or
/api/HomeAutomation.HomeGenie/D8/Control.Off
```
## Components listing
Gerber files required for printing the circuit board are located in the `./pcb` folder.
- https://github.com/genielabs/homegenie-mini/tree/master/pcb
You can use the Gerber file and autonomously get HomeGenie Mini board manufactured from any PCB
print service.
If just need a few boards you can get 3 boards for less than $20 from [AISLER](https://aisler.net/).
Open **AISLER** website and click **Get Started** then you will be able to upload
[HomeGenie Mini Gerber](https://github.com/genielabs/homegenie-mini/raw/master/pcb/HomeGenie_Mini_Gerber_V1.1.25.zip) file and order your PCBs.
The PCB size is 44mm*50mm.
**Components listing**
- 1 ESP8266 WeMoo D1 mini WiFi module (or equivalent)
- 1 DS18B20 (temperature sensor)
- 1 LDR (light sensor)
- 1 FS1000A (RF transmitter)
- 1 XY-MK-5V (RF receiver)
- 1 R1 10kΩ
- 1 R2 4.7kΩ
- 1 R3 330Ω
- 1 R4 330Ω
- 2 LED 3mm
- 1 Push button 6mm*6mm
**Source code**
- https://github.com/genielabs/homegenie-mini/tree/master/src
**Release**
- https://github.com/genielabs/homegenie-mini/releases/
## Disclaimer
THIS PROJECT IS PROVIDED BY THE COPYRIGHT HOLDERS AND CONTRIBUTORS "AS IS" AND ANY EXPRESS OR IMPLIED WARRANTIES, INCLUDING, BUT NOT LIMITED TO, THE IMPLIED WARRANTIES OF MERCHANTABILITY AND FITNESS FOR A PARTICULAR PURPOSE ARE DISCLAIMED. IN NO EVENT SHALL THE COPYRIGHT OWNER OR CONTRIBUTORS BE LIABLE FOR ANY DIRECT, INDIRECT, INCIDENTAL, SPECIAL, EXEMPLARY, OR CONSEQUENTIAL DAMAGES (INCLUDING, BUT NOT LIMITED TO, PROCUREMENT OF SUBSTITUTE GOODS OR SERVICES; LOSS OF USE, DATA, OR PROFITS; OR BUSINESS INTERRUPTION) HOWEVER CAUSED AND ON ANY THEORY OF LIABILITY, WHETHER IN CONTRACT, STRICT LIABILITY, OR TORT (INCLUDING NEGLIGENCE OR OTHERWISE) ARISING IN ANY WAY OUT OF THE USE OF THIS PROJECT, EVEN IF ADVISED OF THE POSSIBILITY OF SUCH DAMAGE.
近期下载者:
相关文件:
收藏者: