GetStarted
说明: 这一开始是对一个新的去中心化世界的介绍,我们认为这是所有未来应用的90%的起点。
(This starter is an introduction into a new decentralised world and what we believe to be the starting point for 90% of all future applications.)
(This starter is an introduction into a new decentralised world and what we believe to be the starting point for 90% of all future applications.)
文件列表:
components/
pages/
public/
queries/
services/
stores/
styles/
types/
utils/
.env.local.example
.eslintrc.json
.prettierrc
LICENSE
actions.json
env-config.ts
missions.json
next.config.js
package.json
postcss.config.js
tailwind.config.js
tsconfig.json
yarn.lock
pages/
public/
queries/
services/
stores/
styles/
types/
utils/
.env.local.example
.eslintrc.json
.prettierrc
LICENSE
actions.json
env-config.ts
missions.json
next.config.js
package.json
postcss.config.js
tailwind.config.js
tsconfig.json
yarn.lock
> [!NOTE]
> This template is no longer maintained. Please use the new [get-started template](https://github.com/open-format/get-started).
# What is GetStarted?
This starter is an introduction into a new decentralised world and what we believe to be the starting point for 90% of all future applications. It features a fundamental file structure boilerplate, which comprises of an admin area, authentication, and a tokenised system with Action Tokens, Badges, and Reward Tokens, all integrated into a front-end application built using NextJS and the OPENFORMAT SDK.
## Mechanics Overview
To keep this as simple as possible we’re very opinionated with the rules while still retaining as much flexibility as possible to account for most scenarios out of the box.
| Mechanism | Earn | Utility |
| ------------- | ------------- | -------------------------- |
| Reward Tokens | From Missions | Governance, Digital assets |
| Action Tokens | From Actions | Progress/Loyalty |
| NFT Badge | From Missions | Trophy, Access |
### Leaderboard
The leaderboard lists the users in descending order by their Action Tokens. This leaderboard can be overall, or dimensioned by a time based frequency such days, weeks, months.
### Profile
The profile shows completed actions, completed missions, and gained Action Tokens of the signed-in user.
## Getting started
### Prerequisites
Before we get started there a few steps we need to take first:
1. Web3 wallet - We recommend [Metamask](https://metamask.io/), although a list of wallets supported by Ethereum can be found [here](https://ethereum.org/en/wallets/find-wallet/#main-content). We’ve created a [video](https://www.youtube.com/watch?v=ZS7VuGZ5VgI&list=PLtnXR6ERygvJ6qT6UYSH8Ve3RAdgYJN26&index=6&t=801s) that explains what web3 wallets are, why you need one, and how to use them.
2. A Star ID. See [Setup](#setup) below.
3. You’ll need to have **Node 14.6.0** or a later version installed on your local development machine. We recommend using the latest LTS version available.
### Installation
```bash
# With npx (recommended)
npx create-open-format-app
# Global installation with npm
npm install -g create-open-format-app \
create-open-format-app
# Global installation with yarn
yarn global add create-open-format-app \
create-open-format-app
```
## Setup
### Star ID
To interact with the OPENFORMAT ecosystem, you will need a Star ID, which acts as an API Key. View our [docs](https://docs.openformat.tech/quickstart/typescript#setup) to learn how to create one. Generating a Star ID requires
a Web3 wallet with sufficient funds to cover the gas fees. Depending on the network, you can obtain funds from a [faucet](https://faucet.polygon.technology/).
 ### Private Key
Your Ethereum wallet's private key is set in the environment variables during setup to be used in the `/api` endpoint to pay for triggering tokens. It is extremely important to keep your private key secure and avoid exposing it within the application. We do not store or have access to your private key during setup. You can view the code [here](https://github.com/open-format/create-open-format-app/blob/main/helpers/index.ts#L53-L94). If using Metamask, see this [guide](https://support.metamask.io/hc/en-us/articles/360015289632-How-to-export-an-account-s-private-key) on how to export your private key.
### Private Key
Your Ethereum wallet's private key is set in the environment variables during setup to be used in the `/api` endpoint to pay for triggering tokens. It is extremely important to keep your private key secure and avoid exposing it within the application. We do not store or have access to your private key during setup. You can view the code [here](https://github.com/open-format/create-open-format-app/blob/main/helpers/index.ts#L53-L94). If using Metamask, see this [guide](https://support.metamask.io/hc/en-us/articles/360015289632-How-to-export-an-account-s-private-key) on how to export your private key.
 ### Next Steps
After creating your project, navigate to the project folder and start the development server:
```bash
cd
### Next Steps
After creating your project, navigate to the project folder and start the development server:
```bash
cd
npm run dev
# or
yarn dev
# or
pnpm run dev
```
If everything is setup correctly, the application will be available at [http://localhost:3000](http://localhost:3000)
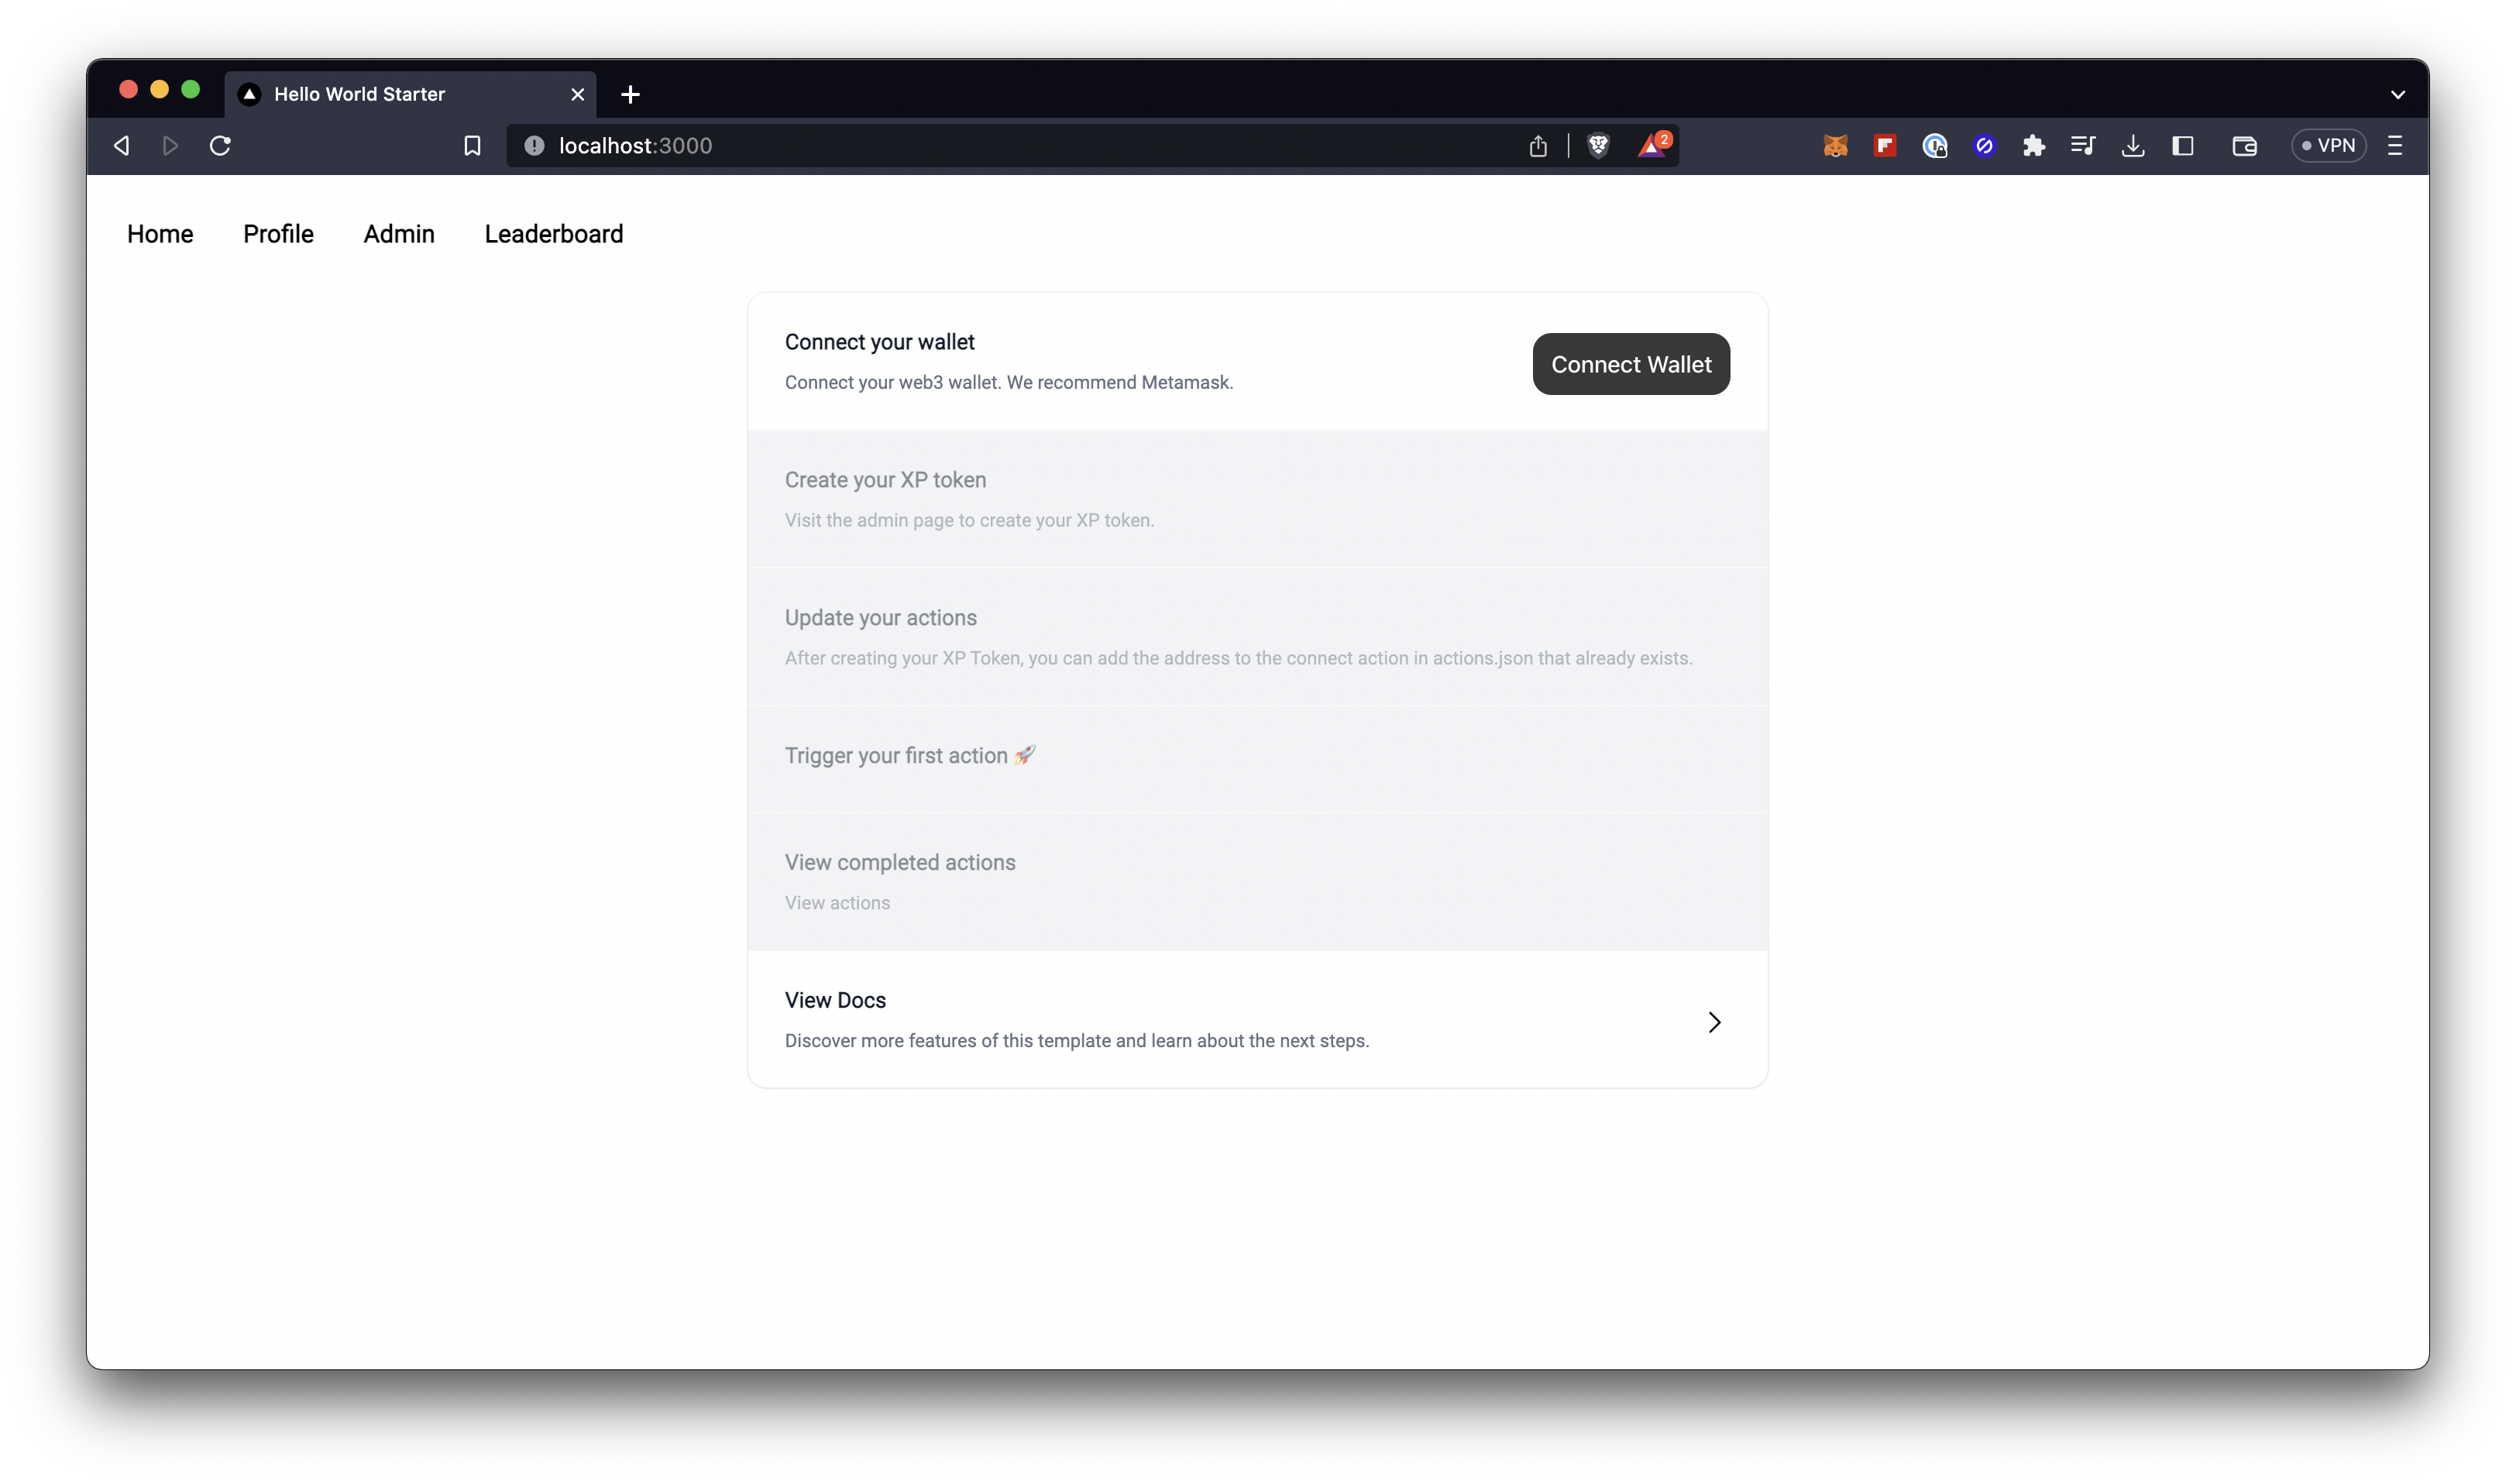 Follow the getting started guide on the index page to connect your wallet, create your first token and trigger for your first action!
## Folder structure
| File/Folder | Purpose |
| ------------ | -------------------------------------------------------------------------------------------------------------------------------------------------------------------------------------------------------------------------------------------------------------------------------------- |
| components | The components folder typically contains reusable UI components that are used throughout the application. These components are often designed to be modular, allowing them to be used in different parts of the app without having to rewrite the same code multiple times. |
| pages | The pages folder in a contains the various pages that make up the application. Each page is represented by a single file in this folder. The api folder contains any api endpoints. |
| queries | The queries folder contains any graphql queries used to fetch blockchain data from our subgraphs. |
| public | The public folder in a Next.js app is where you can add static assets such as images, videos, and fonts. These assets can be used throughout your application. When you reference an asset in the public folder, it will be served as a static file from the root of your application. |
| .env.local | The .env.local stores any environment variables or secrets used in your application. |
| package.json | package.json is a file that contains metadata about the project, including dependencies, scripts to run, and version information. It is used by package managers like npm to install the necessary dependencies for the project. |
| types | The types folder holds any typescript types used in your application. |
| utils | The utils folder in a Next.js application often contains utility functions and helper modules that can be used throughout the application. There is where you can find the main logic for the token system. |
| services | The services folder contains any services. This is where you can find the token service. |
| styles | This folder includes any styles. We have added TailwindCSS. Feel free to swap this our for your own CSS framework or native CSS. |
| node_modules | The node_modules folder contains libraries downloaded from npm |
| README | This is a brief instruction manual for your application. You should edit this file to tell others what your application does, how to set it up, and so on. |
| .gitignore | This filetells Git which files to ignore when committing your project to the GitHub repository |
## Actions and Missions
### What are actions
An action is simply when a user does something in your app, such as connecting their wallet, posting a comment or sending a message. For each action, they will be sent a certain amount of Action Tokens. You can set which actions you want users to receive Action Tokens for and the amount they will receive for each action. Once a user completes an action, the token mechanism will handle the processing of the on-chain token exchange via the OPENFORMAT SDK. You can view completed actions via the OPENFORMAT subgraph.
### Setup
1. Edit the action config in `actions.json`
2. instantiate the token system `const tokenSystem = new tokenSystem(sdk)`
3. Add an action trigger and pass the web3 wallet address of the token receiver and the id of the action set in `actions.json`
```jsx
async function handleConnect() {
if (address) {
await tokenSystem.handleCompletedAction(address, "connect");
}
}
```
### Actions config
```json
[
{
"id": "connect",
"amount": 10,
"description": "Connect your wallet",
"address": "0x17ee65c8c6059cd84973b1e5865b71d0ebc5ff4f"
}
]
```
| Key | Description |
| ------------- | ---------------------------------------------------------------------------------------------------------------------- |
| `id` | Specifies the unique identifier for each action, which is used as a reference in the `handleCompletedAction` function. |
| `amount` | Specifies the number of Action Tokens that should be awarded for completing the action. |
| `description` | Provides a brief description of the action. |
| `address` | Specifies the address of the Action Token that's being sent. |
The `actions.json` file configures which actions should be triggered and how many Action Tokens should be sent for each action.
### View completed actions
You can view completed actions on-chain using our subgraph. You can see an example [here](https://api.thegraph.com/subgraphs/name/open-format/mumbai/graphql?query=%7B%0A++actions%28first%3A+2%2C+where%3A+%7Bapp%3A+%220xfa6439e79bd79d245bded41d1bd16f2166347884%22%7D%29+%7B%0A++++amount%0A++++type_id%0A++++token+%7B%0A++++++id%0A++++%7D%0A++++user+%7B%0A++++++id%0A++++%7D%0A++%7D%0A%7D).
## Missions
### What are missions
Missions are sets of actions that users must complete in order to receive tokens. Once a user has completed all the required actions for a mission, they will receive tokens and/or badges. The requirements for each mission are defined in the `missions.json` file, which specifies the actions that need to be completed and how many times each action needs to be completed. Missions are automatically triggered when a set of required actions have been completed. Completed missions can be viewed via the OPENFORMAT subgraph.
### Setup
1. Create your Reward tokens and badges.
2. Edit the missions config in `missions.json`
### Missions config
```json
[
{
"id": "connect_and_share_mission",
"description": "Connect twice times and share once",
"tokens": [
{
"address": "0xc8a0c0aCc1ABbD8cE65Df85533e8CCe0cE37B478",
"amount": 20
},
{
"address": "0x1a7ea9e50b714667fd8422b07933b0945540413c",
"uri": "ipfs://"
}
],
"requirements": [
{ "actionId": "connect", "count": 3 },
{ "actionId": "share", "count": 1 }
]
}
]
```
| Key | Description |
| ------------ | -------------------------------------------------------------------------------------------------------------------------------------------------------------------------------------------------------------------- |
| id | name of the ID. Used as a reference in tokenSystem |
| description | Description of the mission |
| tokens | An array of objects that specify the tokens to be awarded for completing the mission, including the address of the token and the amount to be awarded. the `uri` is the link to the metadata if the token is a badge |
| requirements | An an array of objects that specify the actions that must be taken to complete the mission and the number of times they must be completed. the actionId relates to the actions set in the actions.json |
### View completed missions
You can view completed mission on-chain using our subgraph. You can see an example [here](https://api.thegraph.com/subgraphs/name/open-format/mumbai/graphql?query=%7B%0A++missions%28first%3A+2%2C+where%3A+%7Bapp%3A+%220xfa6439e79bd79d245bded41d1bd16f2166347884%22%7D%29+%7B%0A++++amount%0A++++type_id%0A++++token+%7B%0A++++++id%0A++++%7D%0A++++user+%7B%0A++++++id%0A++++%7D%0A++%7D%0A%7D).
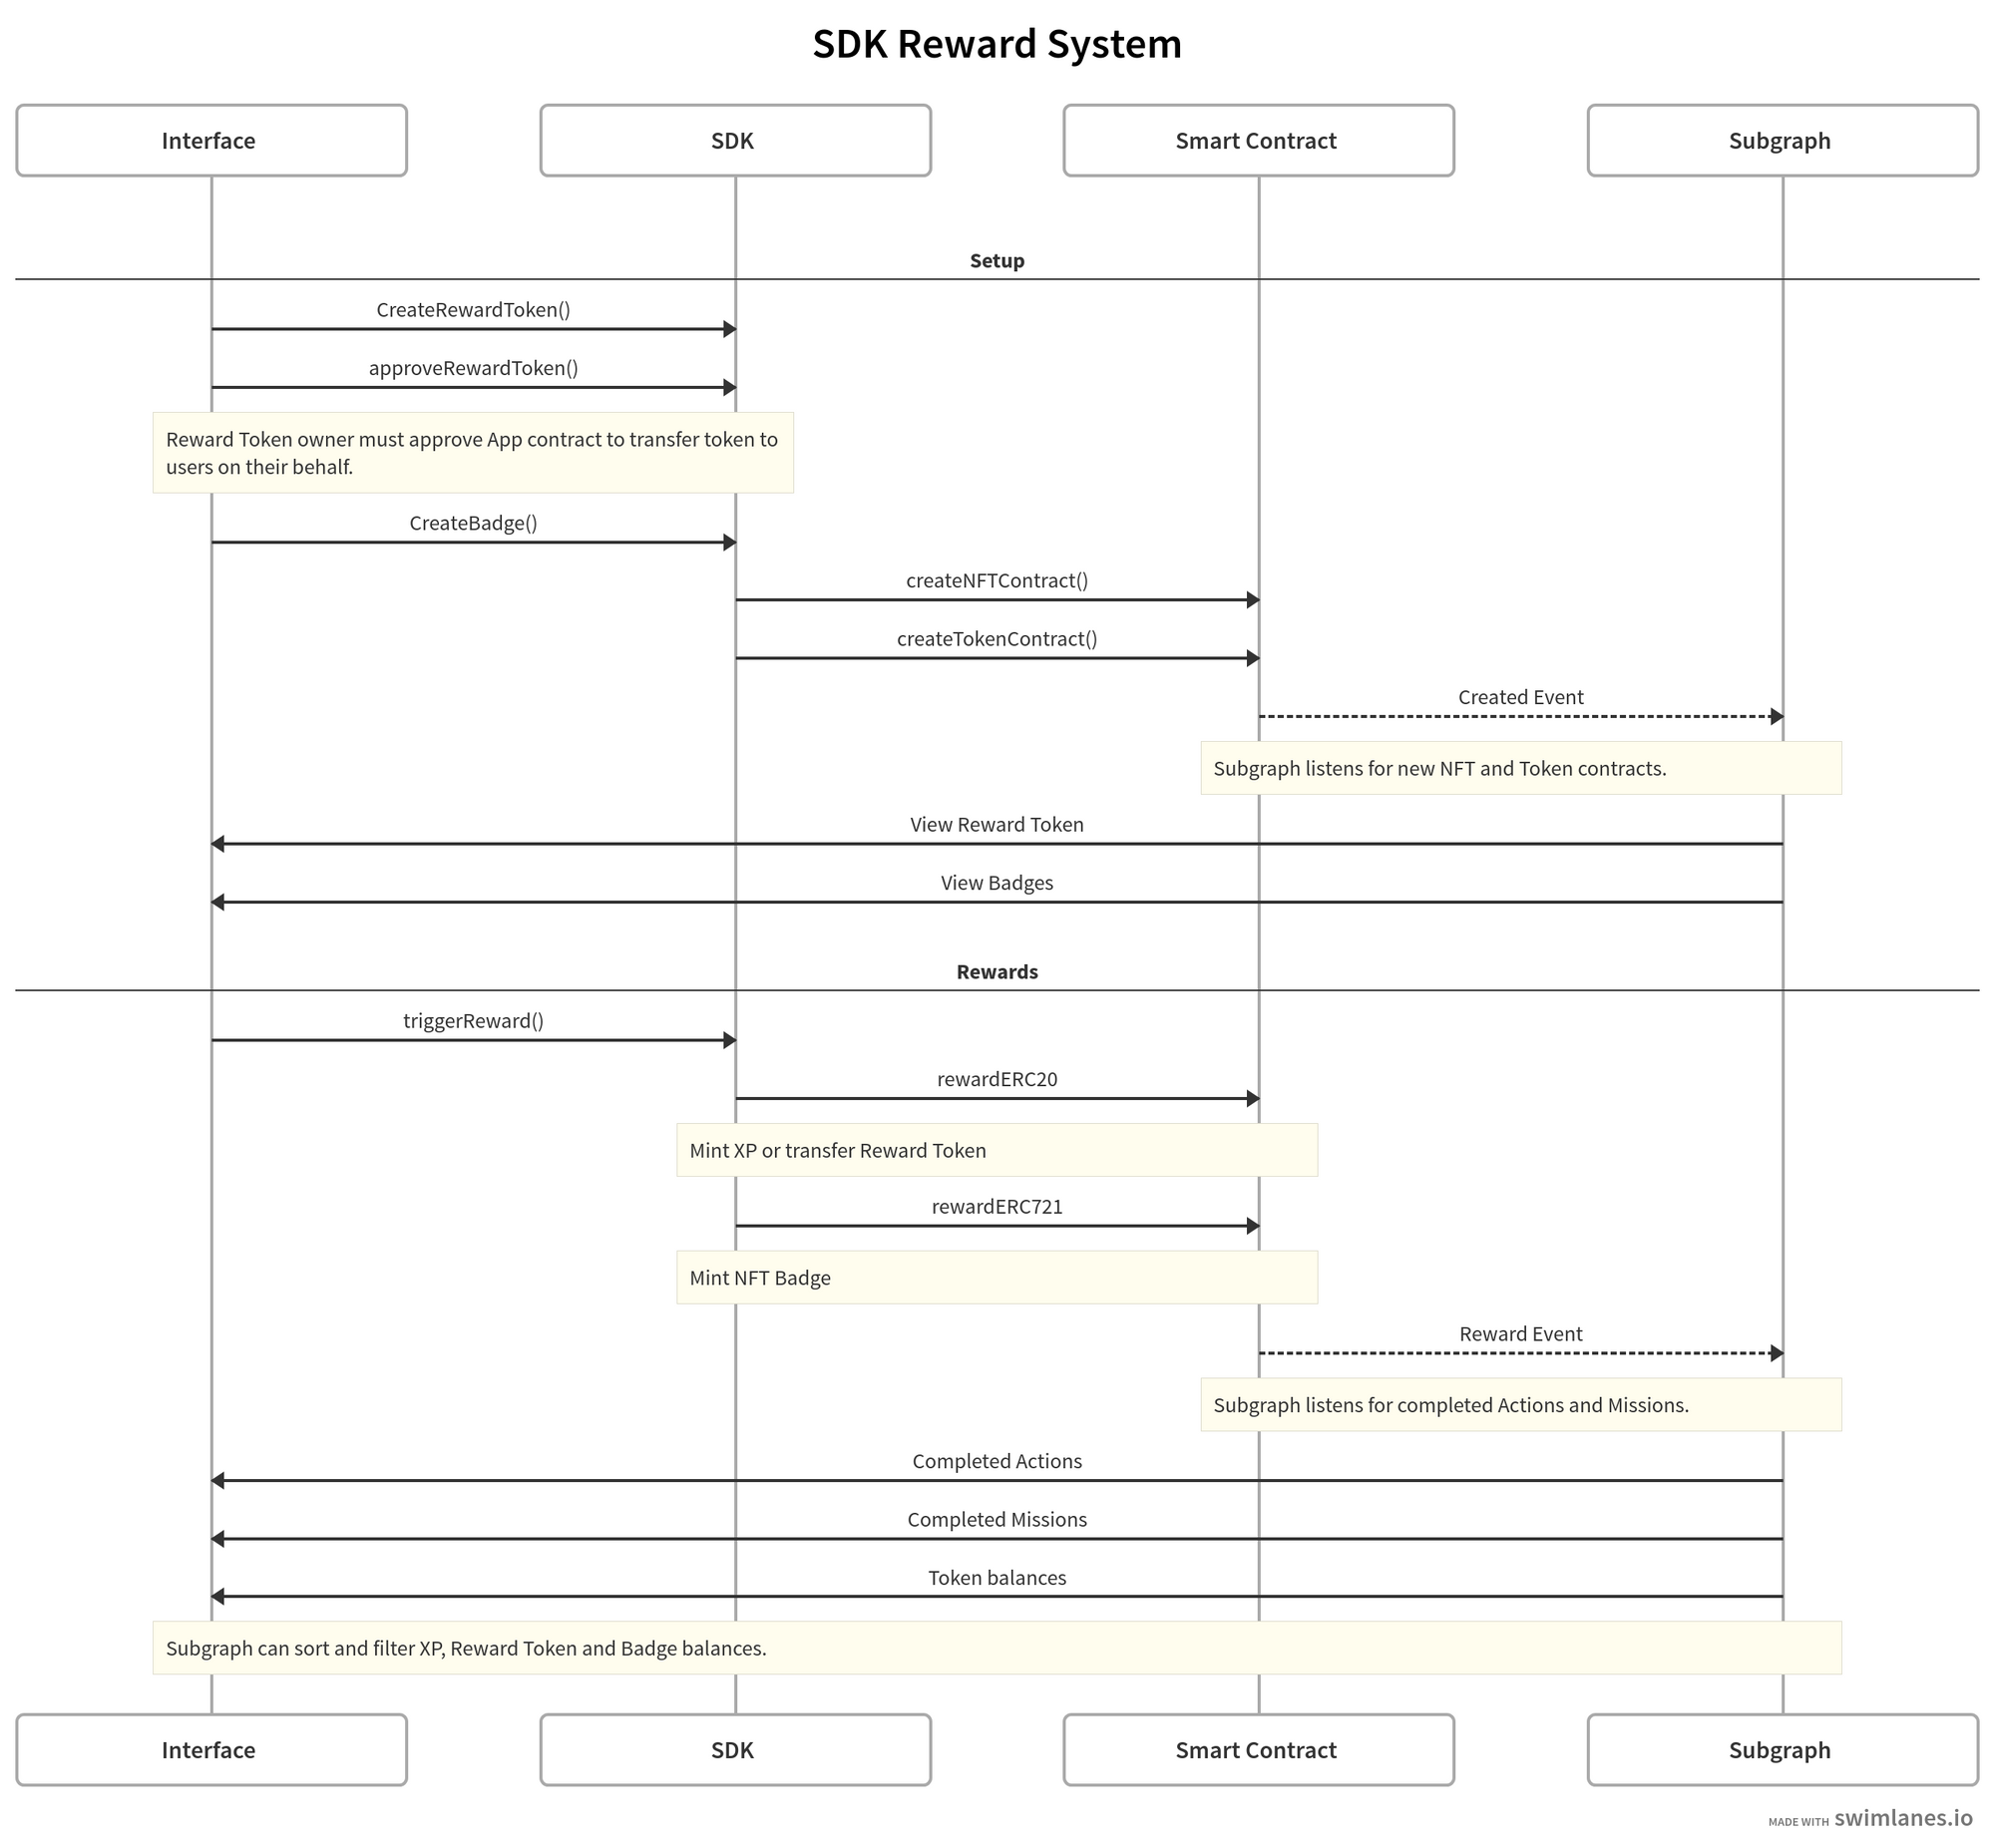
## Architecture
Follow the getting started guide on the index page to connect your wallet, create your first token and trigger for your first action!
## Folder structure
| File/Folder | Purpose |
| ------------ | -------------------------------------------------------------------------------------------------------------------------------------------------------------------------------------------------------------------------------------------------------------------------------------- |
| components | The components folder typically contains reusable UI components that are used throughout the application. These components are often designed to be modular, allowing them to be used in different parts of the app without having to rewrite the same code multiple times. |
| pages | The pages folder in a contains the various pages that make up the application. Each page is represented by a single file in this folder. The api folder contains any api endpoints. |
| queries | The queries folder contains any graphql queries used to fetch blockchain data from our subgraphs. |
| public | The public folder in a Next.js app is where you can add static assets such as images, videos, and fonts. These assets can be used throughout your application. When you reference an asset in the public folder, it will be served as a static file from the root of your application. |
| .env.local | The .env.local stores any environment variables or secrets used in your application. |
| package.json | package.json is a file that contains metadata about the project, including dependencies, scripts to run, and version information. It is used by package managers like npm to install the necessary dependencies for the project. |
| types | The types folder holds any typescript types used in your application. |
| utils | The utils folder in a Next.js application often contains utility functions and helper modules that can be used throughout the application. There is where you can find the main logic for the token system. |
| services | The services folder contains any services. This is where you can find the token service. |
| styles | This folder includes any styles. We have added TailwindCSS. Feel free to swap this our for your own CSS framework or native CSS. |
| node_modules | The node_modules folder contains libraries downloaded from npm |
| README | This is a brief instruction manual for your application. You should edit this file to tell others what your application does, how to set it up, and so on. |
| .gitignore | This filetells Git which files to ignore when committing your project to the GitHub repository |
## Actions and Missions
### What are actions
An action is simply when a user does something in your app, such as connecting their wallet, posting a comment or sending a message. For each action, they will be sent a certain amount of Action Tokens. You can set which actions you want users to receive Action Tokens for and the amount they will receive for each action. Once a user completes an action, the token mechanism will handle the processing of the on-chain token exchange via the OPENFORMAT SDK. You can view completed actions via the OPENFORMAT subgraph.
### Setup
1. Edit the action config in `actions.json`
2. instantiate the token system `const tokenSystem = new tokenSystem(sdk)`
3. Add an action trigger and pass the web3 wallet address of the token receiver and the id of the action set in `actions.json`
```jsx
async function handleConnect() {
if (address) {
await tokenSystem.handleCompletedAction(address, "connect");
}
}
```
### Actions config
```json
[
{
"id": "connect",
"amount": 10,
"description": "Connect your wallet",
"address": "0x17ee65c8c6059cd84973b1e5865b71d0ebc5ff4f"
}
]
```
| Key | Description |
| ------------- | ---------------------------------------------------------------------------------------------------------------------- |
| `id` | Specifies the unique identifier for each action, which is used as a reference in the `handleCompletedAction` function. |
| `amount` | Specifies the number of Action Tokens that should be awarded for completing the action. |
| `description` | Provides a brief description of the action. |
| `address` | Specifies the address of the Action Token that's being sent. |
The `actions.json` file configures which actions should be triggered and how many Action Tokens should be sent for each action.
### View completed actions
You can view completed actions on-chain using our subgraph. You can see an example [here](https://api.thegraph.com/subgraphs/name/open-format/mumbai/graphql?query=%7B%0A++actions%28first%3A+2%2C+where%3A+%7Bapp%3A+%220xfa6439e79bd79d245bded41d1bd16f2166347884%22%7D%29+%7B%0A++++amount%0A++++type_id%0A++++token+%7B%0A++++++id%0A++++%7D%0A++++user+%7B%0A++++++id%0A++++%7D%0A++%7D%0A%7D).
## Missions
### What are missions
Missions are sets of actions that users must complete in order to receive tokens. Once a user has completed all the required actions for a mission, they will receive tokens and/or badges. The requirements for each mission are defined in the `missions.json` file, which specifies the actions that need to be completed and how many times each action needs to be completed. Missions are automatically triggered when a set of required actions have been completed. Completed missions can be viewed via the OPENFORMAT subgraph.
### Setup
1. Create your Reward tokens and badges.
2. Edit the missions config in `missions.json`
### Missions config
```json
[
{
"id": "connect_and_share_mission",
"description": "Connect twice times and share once",
"tokens": [
{
"address": "0xc8a0c0aCc1ABbD8cE65Df85533e8CCe0cE37B478",
"amount": 20
},
{
"address": "0x1a7ea9e50b714667fd8422b07933b0945540413c",
"uri": "ipfs://"
}
],
"requirements": [
{ "actionId": "connect", "count": 3 },
{ "actionId": "share", "count": 1 }
]
}
]
```
| Key | Description |
| ------------ | -------------------------------------------------------------------------------------------------------------------------------------------------------------------------------------------------------------------- |
| id | name of the ID. Used as a reference in tokenSystem |
| description | Description of the mission |
| tokens | An array of objects that specify the tokens to be awarded for completing the mission, including the address of the token and the amount to be awarded. the `uri` is the link to the metadata if the token is a badge |
| requirements | An an array of objects that specify the actions that must be taken to complete the mission and the number of times they must be completed. the actionId relates to the actions set in the actions.json |
### View completed missions
You can view completed mission on-chain using our subgraph. You can see an example [here](https://api.thegraph.com/subgraphs/name/open-format/mumbai/graphql?query=%7B%0A++missions%28first%3A+2%2C+where%3A+%7Bapp%3A+%220xfa6439e79bd79d245bded41d1bd16f2166347884%22%7D%29+%7B%0A++++amount%0A++++type_id%0A++++token+%7B%0A++++++id%0A++++%7D%0A++++user+%7B%0A++++++id%0A++++%7D%0A++%7D%0A%7D).
## Architecture

### Private Key
Your Ethereum wallet's private key is set in the environment variables during setup to be used in the `/api` endpoint to pay for triggering tokens. It is extremely important to keep your private key secure and avoid exposing it within the application. We do not store or have access to your private key during setup. You can view the code [here](https://github.com/open-format/create-open-format-app/blob/main/helpers/index.ts#L53-L94). If using Metamask, see this [guide](https://support.metamask.io/hc/en-us/articles/360015289632-How-to-export-an-account-s-private-key) on how to export your private key.
### Next Steps
After creating your project, navigate to the project folder and start the development server:
```bash
cd
Follow the getting started guide on the index page to connect your wallet, create your first token and trigger for your first action!
## Folder structure
| File/Folder | Purpose |
| ------------ | -------------------------------------------------------------------------------------------------------------------------------------------------------------------------------------------------------------------------------------------------------------------------------------- |
| components | The components folder typically contains reusable UI components that are used throughout the application. These components are often designed to be modular, allowing them to be used in different parts of the app without having to rewrite the same code multiple times. |
| pages | The pages folder in a contains the various pages that make up the application. Each page is represented by a single file in this folder. The api folder contains any api endpoints. |
| queries | The queries folder contains any graphql queries used to fetch blockchain data from our subgraphs. |
| public | The public folder in a Next.js app is where you can add static assets such as images, videos, and fonts. These assets can be used throughout your application. When you reference an asset in the public folder, it will be served as a static file from the root of your application. |
| .env.local | The .env.local stores any environment variables or secrets used in your application. |
| package.json | package.json is a file that contains metadata about the project, including dependencies, scripts to run, and version information. It is used by package managers like npm to install the necessary dependencies for the project. |
| types | The types folder holds any typescript types used in your application. |
| utils | The utils folder in a Next.js application often contains utility functions and helper modules that can be used throughout the application. There is where you can find the main logic for the token system. |
| services | The services folder contains any services. This is where you can find the token service. |
| styles | This folder includes any styles. We have added TailwindCSS. Feel free to swap this our for your own CSS framework or native CSS. |
| node_modules | The node_modules folder contains libraries downloaded from npm |
| README | This is a brief instruction manual for your application. You should edit this file to tell others what your application does, how to set it up, and so on. |
| .gitignore | This filetells Git which files to ignore when committing your project to the GitHub repository |
## Actions and Missions
### What are actions
An action is simply when a user does something in your app, such as connecting their wallet, posting a comment or sending a message. For each action, they will be sent a certain amount of Action Tokens. You can set which actions you want users to receive Action Tokens for and the amount they will receive for each action. Once a user completes an action, the token mechanism will handle the processing of the on-chain token exchange via the OPENFORMAT SDK. You can view completed actions via the OPENFORMAT subgraph.
### Setup
1. Edit the action config in `actions.json`
2. instantiate the token system `const tokenSystem = new tokenSystem(sdk)`
3. Add an action trigger and pass the web3 wallet address of the token receiver and the id of the action set in `actions.json`
```jsx
async function handleConnect() {
if (address) {
await tokenSystem.handleCompletedAction(address, "connect");
}
}
```
### Actions config
```json
[
{
"id": "connect",
"amount": 10,
"description": "Connect your wallet",
"address": "0x17ee65c8c6059cd84973b1e5865b71d0ebc5ff4f"
}
]
```
| Key | Description |
| ------------- | ---------------------------------------------------------------------------------------------------------------------- |
| `id` | Specifies the unique identifier for each action, which is used as a reference in the `handleCompletedAction` function. |
| `amount` | Specifies the number of Action Tokens that should be awarded for completing the action. |
| `description` | Provides a brief description of the action. |
| `address` | Specifies the address of the Action Token that's being sent. |
The `actions.json` file configures which actions should be triggered and how many Action Tokens should be sent for each action.
### View completed actions
You can view completed actions on-chain using our subgraph. You can see an example [here](https://api.thegraph.com/subgraphs/name/open-format/mumbai/graphql?query=%7B%0A++actions%28first%3A+2%2C+where%3A+%7Bapp%3A+%220xfa6439e79bd79d245bded41d1bd16f2166347884%22%7D%29+%7B%0A++++amount%0A++++type_id%0A++++token+%7B%0A++++++id%0A++++%7D%0A++++user+%7B%0A++++++id%0A++++%7D%0A++%7D%0A%7D).
## Missions
### What are missions
Missions are sets of actions that users must complete in order to receive tokens. Once a user has completed all the required actions for a mission, they will receive tokens and/or badges. The requirements for each mission are defined in the `missions.json` file, which specifies the actions that need to be completed and how many times each action needs to be completed. Missions are automatically triggered when a set of required actions have been completed. Completed missions can be viewed via the OPENFORMAT subgraph.
### Setup
1. Create your Reward tokens and badges.
2. Edit the missions config in `missions.json`
### Missions config
```json
[
{
"id": "connect_and_share_mission",
"description": "Connect twice times and share once",
"tokens": [
{
"address": "0xc8a0c0aCc1ABbD8cE65Df85533e8CCe0cE37B478",
"amount": 20
},
{
"address": "0x1a7ea9e50b714667fd8422b07933b0945540413c",
"uri": "ipfs://"
}
],
"requirements": [
{ "actionId": "connect", "count": 3 },
{ "actionId": "share", "count": 1 }
]
}
]
```
| Key | Description |
| ------------ | -------------------------------------------------------------------------------------------------------------------------------------------------------------------------------------------------------------------- |
| id | name of the ID. Used as a reference in tokenSystem |
| description | Description of the mission |
| tokens | An array of objects that specify the tokens to be awarded for completing the mission, including the address of the token and the amount to be awarded. the `uri` is the link to the metadata if the token is a badge |
| requirements | An an array of objects that specify the actions that must be taken to complete the mission and the number of times they must be completed. the actionId relates to the actions set in the actions.json |
### View completed missions
You can view completed mission on-chain using our subgraph. You can see an example [here](https://api.thegraph.com/subgraphs/name/open-format/mumbai/graphql?query=%7B%0A++missions%28first%3A+2%2C+where%3A+%7Bapp%3A+%220xfa6439e79bd79d245bded41d1bd16f2166347884%22%7D%29+%7B%0A++++amount%0A++++type_id%0A++++token+%7B%0A++++++id%0A++++%7D%0A++++user+%7B%0A++++++id%0A++++%7D%0A++%7D%0A%7D).
## Architecture

近期下载者:
相关文件:
收藏者: